
Last Updated on 4 years ago by admin
3uTools is a feature-filled application that only supports Windows PC’s at the movement.
It can be called as the Most Effective iOS Files & Data Management Tool. it also supports managing apps, music, photos, videos, ringtones, and other multimedia file types.
The 3u Tools application can be installed on a Windows PC with very few steps. However, there are a few things that you need to keep your eye focused. Therefore, it is advisable to check the walkthrough guide 3uTools – Universal application for iOS device.
Checkra1n Jailbreak Compatibility
The installation of Checkra1n over 3uTools supports iOS version 12.4.8 – 13.7. Also, the iOS 14 beta is open for testing.
Requirements
- Windows PC with a successful installation of 3uTools.
- iPhone Charger cable/lighting cable.
- USB Drive/Thumb Drive with at least 200MB free data. (Recommended to use one without data as the device will get wiped out during the process)
- Finally, the iPhone
Step guide for Checkra1n Jailbreak 3uTools
Note – Steps below are shared assuming that you already have 3u tools installed on your pc. If not, please follow the 3u tools installation guidelines.
- FIrstly, open the 3uTools application on your PC and connect your iPhone.
As described in the screenshot, do not use damaged lightning cables, USB extension codes, or male/female USB connectors. Also, it recommended using the original charger cable to avoid unwanted complications during the process.
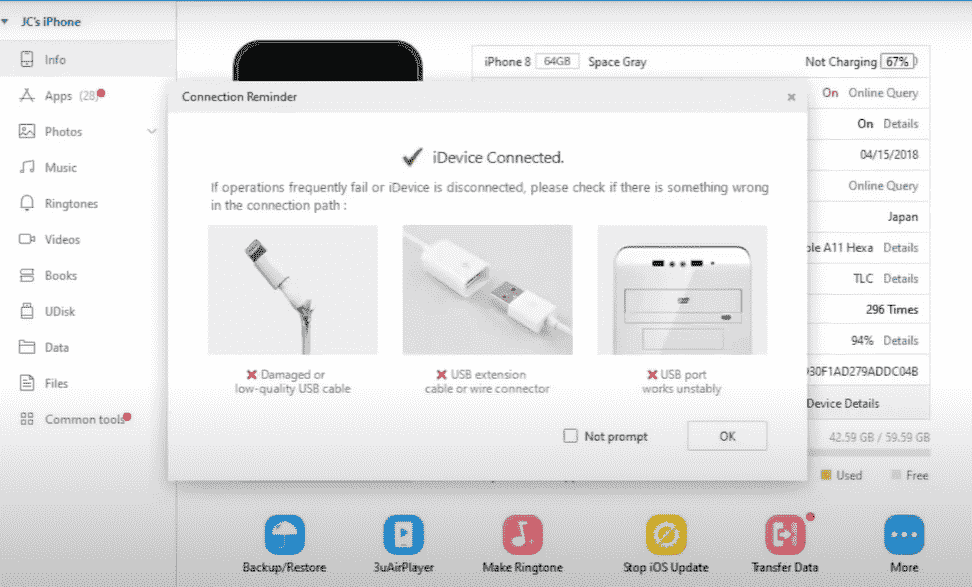
Click the “OK” button.
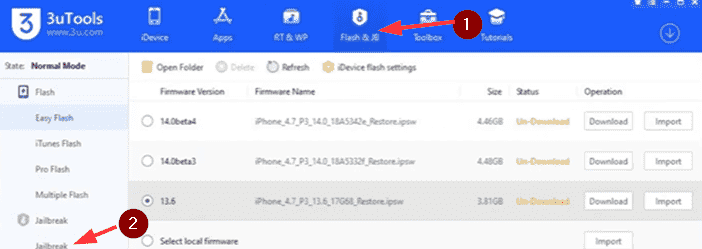
- Once you close the banner, go to the upper section menu bar on the app and select “Flash & JB” then on the Left select “Jailbreak.” Reference the screenshot below.
- Just below the top menu, look for “Make Checkra1n jailbreak USB flash drive” and click on it.

- When you see the pop-up screen, “Make Checkra1n jailbreak USB flash drive.” plugin the USB Drive.

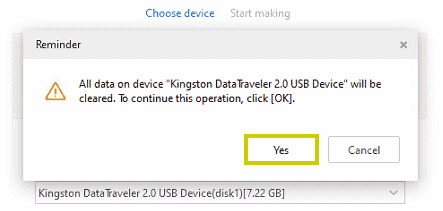
- Once the device is plugged in, it will automatically get detected by the 3uTools app. Next, Click “Start making.”

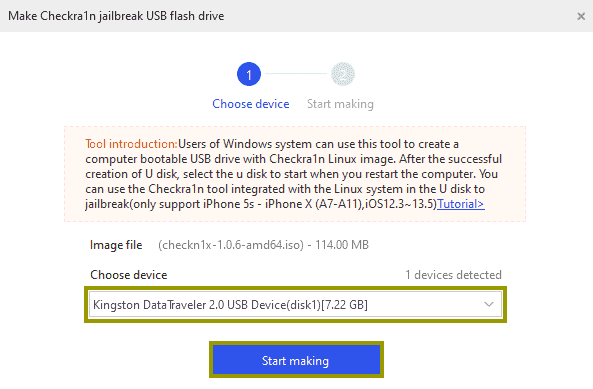
- Also, you should see the message informing that all saved data in your Flash Drive will be cleared. Before pressing “Yes,” make sure nothing important is saved in your USB Drive.
- The process may take 2-3 minutes, depending on your drive access speed.
- When completed, press “Close.”


- Above all, pay attention to the steps here onward.
Now it’s time to boot the computer using the created Checkra1n jailbreak USB.
It means that you need to set your computer bios into the legacy mode and change the boot sequence to boot from USB. Furthermore, if you are not familiar with this process, follow the guide carefully.
Step 1 to 4 – Select Boot Option in BIOS
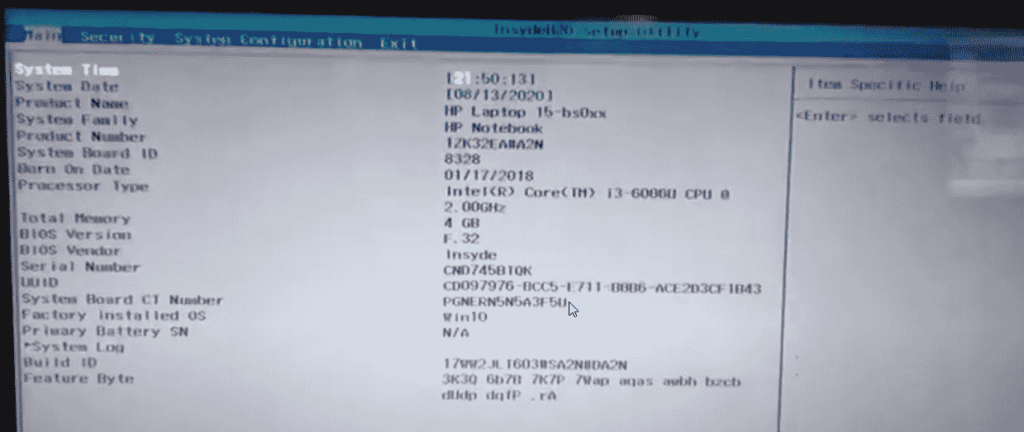
- The laptop I am using is HP, so the button to load BIOS is F10. If you are not sure of the key you should use to access BIOS, follow the guide here.
- After, finding the BIOS key from the guide, restart your PC and press F10 (your PC BIOS key) before Windows loads. So, here’s my BIOS screen.
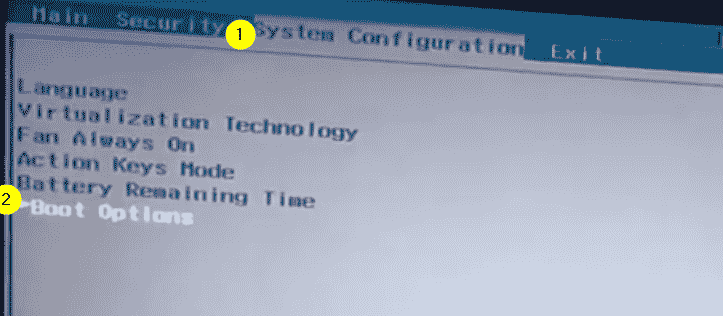
- Go to “System Configuration” and select “Boot Options.” Sometimes your BIOS screen may not be the same. But don’t worry, it is not that hard to find.
- Afterwards, we need to enable “Legacy Support.”

<<Most Importantly, make notes of all the changes, as you need to roll back the changes to boot into Windows which you were using>>
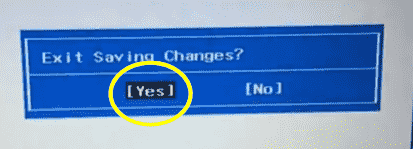
- Now, save and exit BIOS by pressing “F10” and press “Yes” in the pop-up screen.

- Next, you need to select USB from the boot menu. For this, you need to press the “F9” button in HP. Refer to the previous guide to find the “Boot Once” key for your PC.
- When you see the “Boot Option Menu,” select USB Hard Drive, displaying the USB Drive Brand in front and Press Enter.
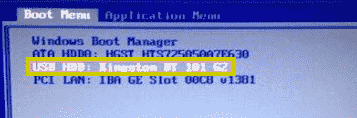
- The PC should boot from the checkra1n boot disk. Once completed, it should display as below.
Since we have successfully booted using the Checkra1n jailbreak USB flash drive now, we need to make some iPhone changes.
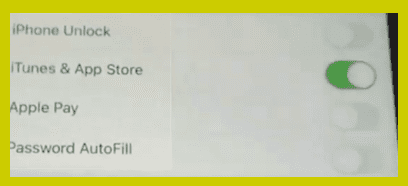
10. Now go to your iPhone > Settings > Touch ID & Passcode. Type your passcode and disable the blow options.
- iPhone Unlock.
- Apple Pay.
- Password AutoFill.
Also, check the screenshots to make sure you didn’t miss anything.
- Afterwards, turn Off Passcode.
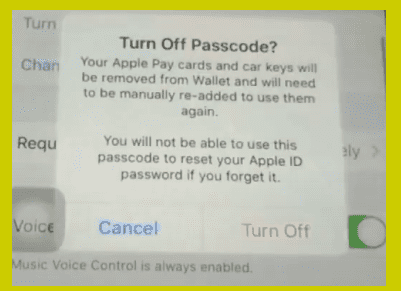
- Enter your Apple ID and Passcode, press enter. Once again, you might have to insert your passcode.
11. Go to your home screen, turn off the internet activity by turning on airplane mode.
12. Now its time to connect the iPhone to the PC with the lightning cable.
13. Also, on the pop-up screen, select “Trust”
14. If you see the message, “Sorry, iPhone 8(Global) is supported, but iOS 13.6 is not.

15. Go to “Options” >
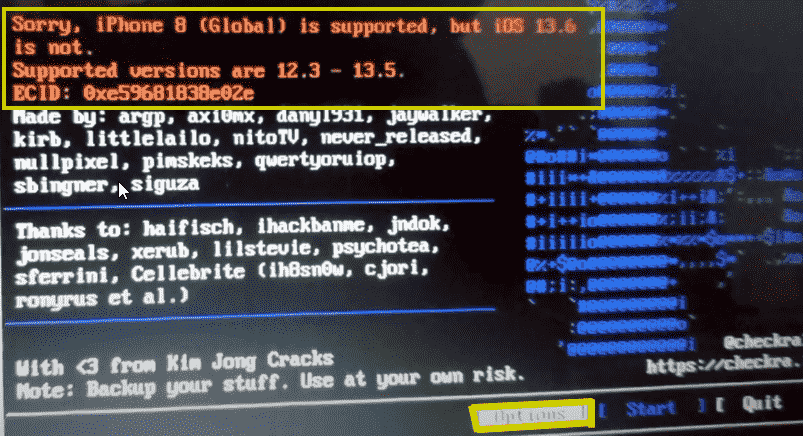
16. Select – Allow untested iOS / iPad OS / TVOS versions and hit enter
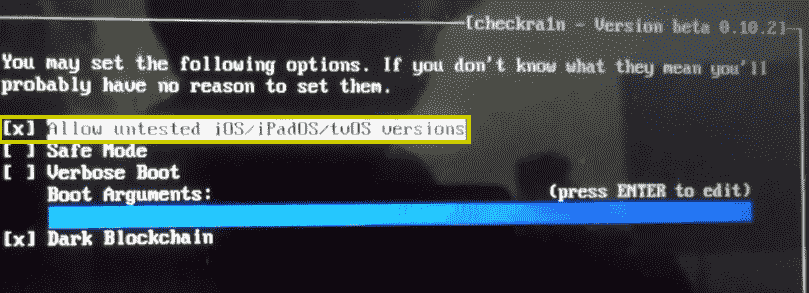
17. Next, hit Okay on the Warning Message.
18. The device needs to be put into DFU mode – message will appear > Press Next.

20. You should see the below screen on your iPhone.
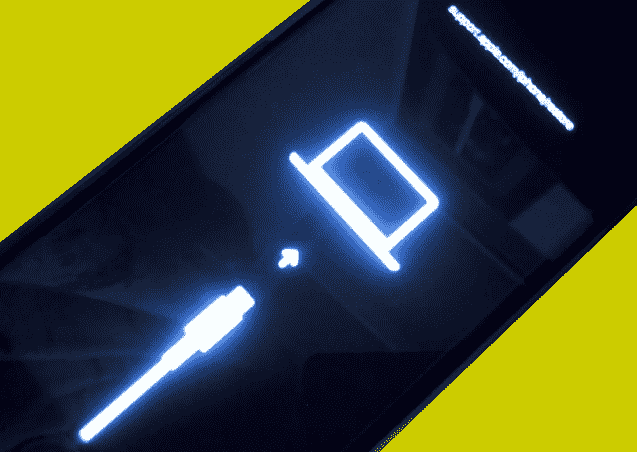
19. Wait until your device boots in DFU Mode.
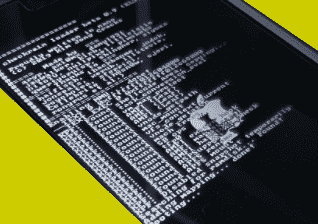
21. Thereafter follow the steps in your PC screen. The steps may differ according to the phone model.

22. If you see the iPhone booting with a script running like shown below. That means the jailbreak is successful
23. Afterward, wait for the lock screen, open/unlock, and enable WiFi connection and connect to the Internet to show the checkra1n icon
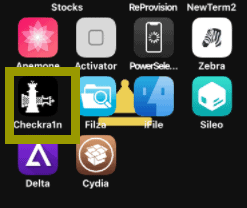
24. Now open checkra1n, then select Cydia, then press > Install Cydia and wait for it to install.
25. Open Cydia from the Home screen.
25. Finally, test it to see that Cydia is fully loaded. If this works, that means the Jailbreak is successful.
Hope the instructions provided is clear. In the meantime, if you run into any errors, please share it in the comments. We will try t provide solutions as soon as possible.
You May also like:
- Unc0ver iOS 13 – iOS 13.5 Jailbreak with AltStore
- Odyssey Jailbreak for iOS 13 – iOS 13.5 Jailbreak
- iRemovalRa1n Jailbreak – Checkra1n for Windows
- Re-sign Unc0ver Jailbreak iOS 13.5 with ReProvision [No Computer]
- nullxImpactor – Alternative for Cydia Impactor
One thought on “Checkra1n Jailbreak with 3uTools on Windows PC”
Leave a Reply
You must be logged in to post a comment.

What’s up friends, good post and nice arguments commented here,
I am genuinely enjoying by these.