
Last Updated on 5 years ago by admin
EPEVER Tracer MPPT Solar Charger Controller Wi-Fi Monitoring System using Node MCU
In my previous posts I mentioned that I will be sharing a Wi-Fi monitoring system for the Epever Tracer MPPT Solar charger controllers. And this article is totally about making it from scratch.
What is EPEVER Tracer MPPT Solar Charger Controller
Epever MPPT charge controller Charger Controller is a superior quality affordable Chinese make. Most off-grid DIY projects use this brand. And it is well known among the solar market.
Advantages of NodeMCU wifi monitor vs Epever eBox Wi-Fi connector
Main advantage is that the NodeMCU supports monitoring through any location around the work. But the eBox Wi-Fi connector only works within the LAN or 50M distance.
In addition, there are many more advantages like tracking history, exporting data to csv file.
How to make the Node MCU EPSolar WiFi tracker.
First, you need to have the below items.
- Node MCU
- Logic Level Bidirectional Module 5V to 3.3V
- Max 485
- Network cable with jack (patch code) 1M is more than enough
- Male to Male / Male to Female / Female to Female jumper files or skills to solder.
- Blynk App access with energy (you can purchase energy for few USD through the app store)
Wiring Diagram for Epever Tracer solar tracker
To make the work easier I have shared pictures of the actual device in the wiring diagram
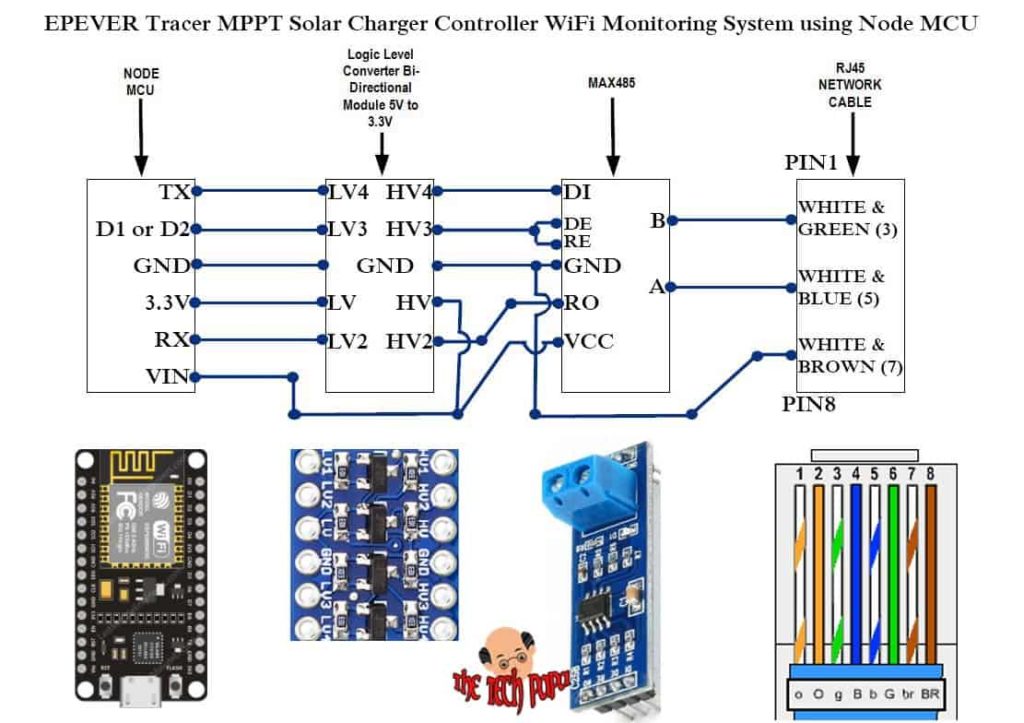
What is special in the wiring diagram provided by techpapa.com
You may come across Wi-Fi Data trackers for Epever MPPT solar charge controller in many sites, but the Logic Level Bidirectional Module is not included in those. Though the circuit works without the Logic Level Bidirectional Module it can damage the Node MCU in a few days as the note MCU functions with 3.3 volts and the. Therefore, please make sure to use the Logic Level Bidirectional Module in your circuit.
Need to pay attention when connecting network cable
Wrong wiring network cable can cause damage to your charger controller communication port. Therefore, you need to pay extra attention when connecting the wires.
Required Setup Libraries
- Blynk Library – https://github.com/blynkkk/blynk-library
- ArduinoOTA (ArduinoOTA,is part of the nodemcu esp8266 Arduino codebase- therefore not required to download) – https://github.com/esp8266/Arduino/tree/master/libraries/ArduinoOTA
- SimpleTimer – https://github.com/schinken/SimpleTimer
- ModbusMaster – https://github.com/4-20ma/ModbusMaster
Arduino IDE is required for programing the NodeMCU.
Configure Blynk Application for Monitoring Wi-Fi Tracker
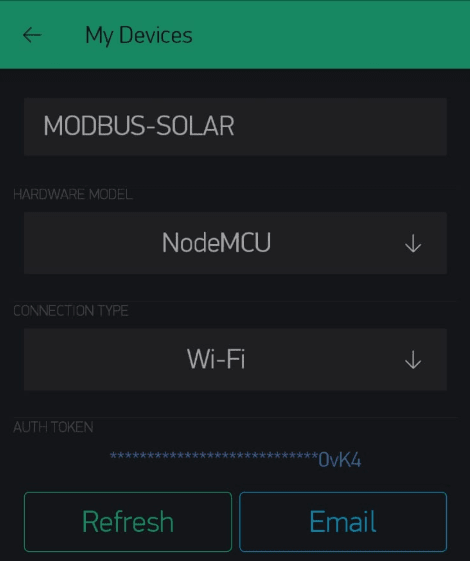
Open Blynk App and scan the QR Code provided.

Scanning the QR code provides an exact copy of my project. Now you need to get the Auth Code for Node MCU. This can be done by going to the newly created project >Settings>Select.
MODBUS-SOLAR from the devices section>again tap on the MODBUS-SOLAR from my devices> Tap Email. Now check your email for the Auth Code.
Uploading code to NodeMCU
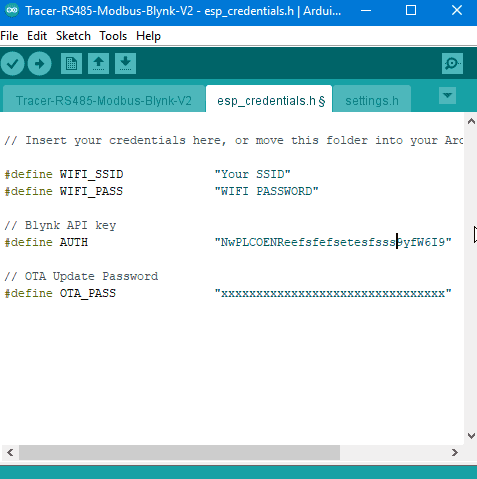
Once you are ready with all the libraries and coding from GitHub the Arduino app should look like the image shared below.
Update your WiFi credentials in the esp_credentials.h section and upload the files. If you are not familiar with the process checkout our previous posts.
Get AUTH Code from previous step.
This process may take 2 to 3 minutes.
Now you can remove the node mcu from PC and connect to the Epever Tracer MPPT unit. Make sure to provide power to Node MCU using the micro-USB port. Also, now you should start seeing data on your app.
If you face any issues, please contact me through the comments section.
