
Last Updated on 2 years by admin
iOS App Signer is an app used for (re)signing iOS apps, which makes the iOS identity it as a trusted app.
What is iOS app signing?
The Apple store includes around 2 million apps, and all those are signed by trusted developers. Apple only supports signed apps and don’t allow even your own app to be used in an iOS device if it is not signed by a trusted developer.
Usually, to sign an app you need to have a paid developer account, which will cost around 99USD per year. Due to this reason individuals who do app development don’t have a way of trying out the apps on iOS devices as they are unable to get signed. But with iOS App Signer it is no longer a problem. It is a free application that runs on Mac which helps you sign and sideload IPA, DEB, APP and xcarchive file formats into iPhones, iPads and even Apple TV.
The complete process of app signing requires other application support such as XCode which we will be taking more in during the process of signing.
How App Signer works
The process is simple, AppSigner helps the developers to bypass the lock which is set for only paid developers. This enables app (re)signing through free developer accounts.
Download iOS App Signer
Click the following link to download App Signer
Download App Signer
Need to know
Before we install App Signer or start building apps we need the tool to do it. And that’s where xcode comes in. It is an Integrated Developer Environment that allows you to write codes.
You can download Xcode from the link below or using the Mac App Store.
How to side-load the IPA using App Signer with Xcode on macOS
Pre requirements to get the App Signer work
- Mac Computer
- iPhone, iPad or a iPad Touch that supports jailbreaking
- Lightning to USB Cable (using third party cheap cables could end up with bad results therefore it is advisable to use a MFi-Certified cable)
- Free Apple developer account
Once you are ready with the above, follow the given below step guide
- Access the Mac App Store or the above given xcode download link to download Xcode to your iMac.
- Once the download is complete, then open the app. Tap Agree on the license agreement and tap on it to proceed.
- Now open the Xcode application by selecting “Create new Xcode project”

- Then select the correct template for your project and hit next.

5. Next enter a Product Name, Organization Name, and Organization Identifier and click on the blue Next button. Always try to use unique information specially for the field “Organization Identifier”

6. In the next screen, select Desktop from the left side pane as the location for file saving. And the select “Create” from the bottom right-hand side.
7. Now it’s time to plug in the iPhone or the iPad using the MFi-Certified cable. Once plugged you should need to trust it from the popup prompt.
8. Now select your device from the Xcode top left drop-down Window.

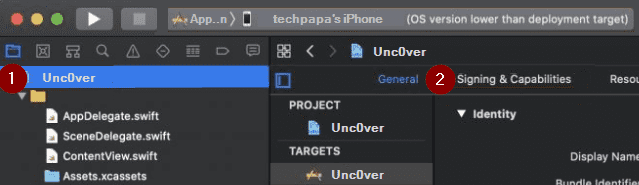
9. Next click on the item at the top of the project tree. Check the screenshot. According to this post we have used “Unc0ver” and tap on Signing & Capabilities.
10. In the next screen select under “Teams” select one of existing teams or create one. We have selected an existing team for demonstration purposes.
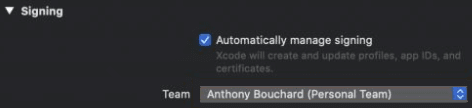
11. However, if you have selected an existing team as we have done, you should get a sign in prompt, use the free developer account and sign in. Once done. follow the screen instructions to select the account from the drop-down list.
12. After that, double check everything and launch the terminal and enter the command shown below.
13. If you receive the error stating the below command, do a Software Update, it should do the trick.

14. If there’s no error, follow the instruction on the screen and save any certificates that are prompted to save before going ahead.
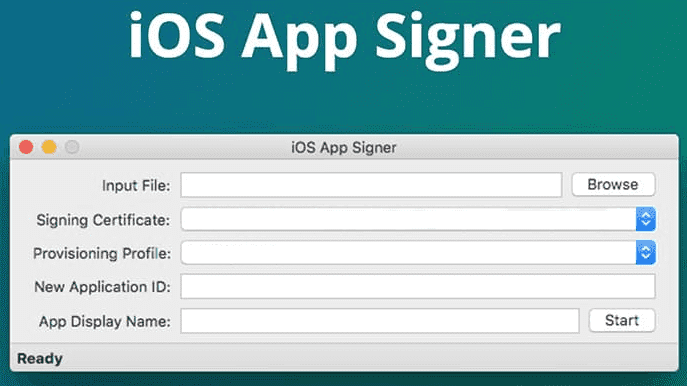
15. Download the “iOS Signer App” from the link above. Then, launch iOS App Signer
16. After that, using the top right-hand side browse button on the iOS App Signer select the .IPA file that you downloaded. In this example the IPA used is unc0ver.

17. After the file is selected as mentioned, you get few more boxes to fill out.
*Signing Certificate (your Apple ID)
*Provisioning Profile (your app identifier) – Attention: Do not leave the “Provisioning Profile” field as Re-Sign. This does not work
*App Display Name (Any name that suits the app)
*App Version (Version that suits your app)
Now select “Start”
18. Upon successful completion of the above steps, you need to select a location for the file saving. Best Practice is select Desktop

19. This process completes saving a signed .IPA file.
20. Now Open Xcode and complete the process of sideloading the signed .IPA file.
Go to Device Simulators on Xcode (Window>Devices and Simulators)

21. In the window that appears next you get to select your iPhone, iPad or the iPad Touch from the left sidebar and then select the plus + button from the bottom windows (do not select the + from the left pane)

22. Now you will see a new window and select the .IPA file from the desktop (previously saved step 17). In this example the name of the file is “Unc0verTest-V4.3” then select Open.
23. Now Xcode will install the app on your iDevice (iPhone or iPad…etc.).
24. Once the installation process completes go to your iPhone settings > General > Device Management and select/ tap Apple Development Apple ID option (in Developer App section)
25. Now you need to tap Trust on two places.
First on the blue Trust Section –![]()
Then on the red Trust Button on the popup.

26. This completes the installation or the sideloading of the signed .IPA file. You should be able to open the newly installed application from the home screen.
If you face any issues or complications during the process, please let us know through the comments section.
You might also like to our following articles:
Taurine Jailbreak released for iOS 14 – iOS 14.3 Jailbreak
Apple releases iOS 14.4.2 with security fix for WebKit & iOS 14.4.2 Jailbreak status
Unc0ver v6.0.0 update added iOS 14.3 – iOS 14 Jailbreak support.
iOS 14 – iOS 14.3 Jailbreak – A lot of jailbreak coming Soon!
PlankFilza released for iOS 14 to iOS 14.3 – A modified version of the Filza file explorer
Facebook Planning on releasing a Smart Watch
iOS 14 New Jailbreak Coming Soon
Apple released iOS 12.5.1 – Everything you need to know