
Last Updated on 4 years by admin
Magisk is how we root these days. So does grant us root access. And of course, a few other things which you get to experience a little bit later. But unlocking the bootloader is probably the most important part out of this whole video. It pretty much opens the gateway to tinkering with your Pixel devices, such as flashing custom ROMs and other things like that.
THETECHPAPA.COM also plans to have a Q&A queue as well. It focuses on some frequently asked questions. If you’re uncomfortable or not too familiar with rooting, feel free to go through the post a few more times. And you can come back with any questions that you might have. And feel free to ask any questions in the comments section below.
Now, one piece of critical information that we need to know is that unlocking the bootloader wipes your internal storage. That includes your downloads, apps, any accounts that you might have, photos, music, etc. Everything will be gone from your device. So please back that up if you need anything from your phone because once you unlock the bootloader, it is gone forever.
Q&A Section
These are the five questions that popped up while I was planning on writing this post.
1. Can I break my device by doing this?
The short answer is that it’s possible, but it is also very unlikely. Now there are a lot of safety nets and precautions that you can take and that your device already has. In case you make mistakes, you should be able to restore it into a working state very quickly using the factory images that are provided by Google. The factory images are just pretty much stock or original firmware that we can install or flash onto our phone, and we’ll be using that quite a lot throughout our lifetime using this device.
2. Will I get updates after unlocking bootloader/ rooting?
The answer is, yes. You should receive OTA (Over The Air) updates when you go to about phone, and you check for updates. However, OTA updates are not sure with Project Mainline. That thing is separate to OTA’s and allows other manufacturers to update components of Android without you having to proceed with “Over The Air” updates. In this case, you don’t get any OTA updates. But still, updates are possible manually using the factory images.
So there are two ways to updates
i. Via OTA updates
ii. Via flashing factory images using fastboot and patching the stock boot image again. Similar to what we do in this scenario to escape route access after we flash the factory images.
3. Will my Apps normally work after Rooting?
Yes, but you may need Magisk & Magisk hide. Magisk can hide itself, it isn’t perfect, but it is close.
4. Can I Unroot?
Yes, you can. You can use the factory image to restore your Pixel 4 to its original state. It is not covered in this post.
5. Do I need to have a fully charged battery to proceed?
Yes, you should have 80% or high battery level. It can save you from unplanned risks. It is the silliest question among the list, but it can save your device from unwanted complications.
And with all that being said, if you have any other questions, of course. Awesome, that’s normal, feel free to go through the post a few more times. And you can come back with any questions through the comments section below.
Let’s begin Rooting the Pixel 4
We need to enable a few things on our devices, and this will pretty much make or break your rooting experience.
1st Enable developer options by following the steps below.
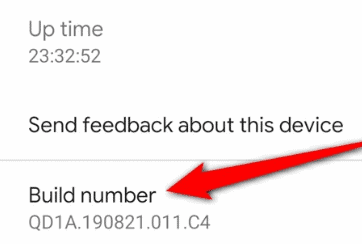
Head over to the settings, go down all the way to about phone, Then scroll down until you see your build number and tap on that seven times until you are prompted to enter your pin pattern or passcode. This enables the developer options for you.
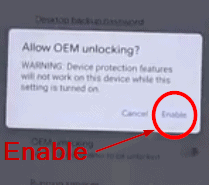
Once you have done that, you can go back and then go to a system. Go down to advanced and enter the developer options. You need to be able to turn on a whim. Unlocking and if this is disabled or it says contact your carrier, or it is not available for network lock devices, you may need to contact your carrier and see what it is they want from you for you to be able to enable a way of unlocking. But if you can not enable this right now. You might not get the chance to proceed ahead. But if you can enable it, you need to do so. Enter your pin Pattern or passcode again to confirm, and then you’ll need to tap on enable here.
And the next thing needs to do is to scroll down a little bit and enable you USB debugging.
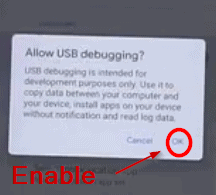
Now, this allows us to use ADP. It’s just a way for us to communicate while the phone is plugged into the computer and the phone is booted into Android. So that’s something that we need to enable as well.
So once you have those two things done, we can now go ahead and go back to our computer because we’ll need to download a few things. The first thing you need to download is Google USB drivers. Now, this step isn’t usually necessary, but just in case we need it, I recommend that you head over to this link and click on this button here to download the zip file with the drivers in it and agree to the terms and conditions. Click on the blue download button.
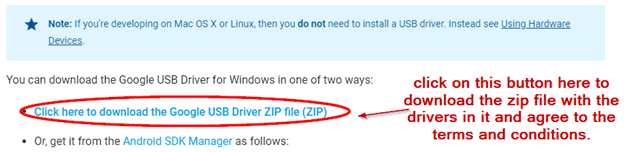
I recommend that you save all downloads into one folder so that we can keep track of everything. And these drivers are here just in case Windows can’t automatically download or can’t find them for our pixel. So it’s always quite important to have the official Google drivers.
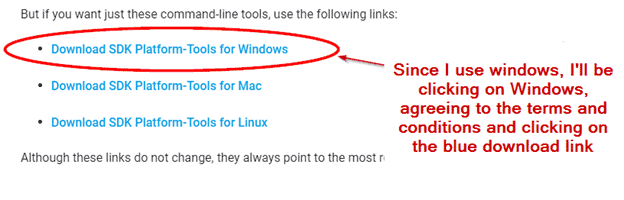
Now, the next thing I want to download is the latest version of the STK platform tools. This is the package that gives you all the files, including those two executables that you’ll need to run what we call ADB and fastboot commands on our phone from our computer. So download the latest version of Android SDK Platform Tools here for your operating system. Since I use windows, I’ll be clicking on Windows, agreeing to the terms and conditions and clicking on the blue download link. I’ll also save this in the same folder, which I used for my previous download.
The next thing you want to download is the latest factory image, but it may not always be the latest. We’ll need to head back over to our phone for a second here to find the Build Number.
So with that in mind, you’ll need to find the image on google developers page. Go down to where your devices. So I have the regular pixel, so I’ll be clicking on the flame on the right-hand side. And basically what you can see on your phone here. You just need to match the one that you see on this Web site here.
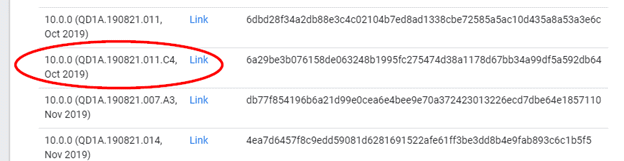
Once you find the match like shown above, you need to go ahead and download it. Keep in mind that you just needed to match the Build Number.
And the last thing that we need is the latest version of Magisk Manager. And you need to download this on your phone.
Once you finish downloading this, we’ll just need to install it so fast for this until we end up downloading it. Okay. So once Magisk manager has finished downloading, all you have to do is tap in at to install. And if you haven’t installed anything from Chrome before, they’ll ask you to enable it to be able to install apps from unknown sources. So you’ll need to enable that and then go back and then tap and install.
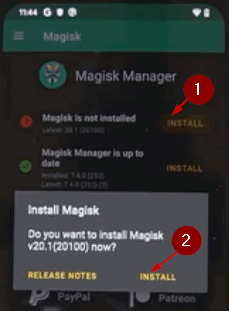
And once that is done, open up Magisk manager, and you should see something like this.
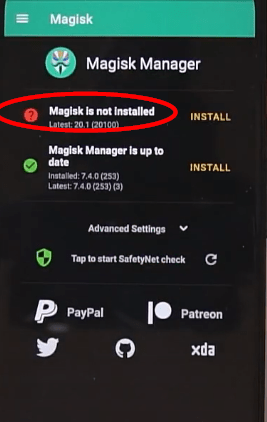
So currently it says that Magisk is not installed, but we’ll fix that soon enough. Right now, you can leave your device as it is.
Now go back to the computer where you have saved your downloads. Extract USB Drivers ZIP file and Android SDK Platform Tools. (close the zip files) And we’ll also open up the factory image. Open that up and open the folder inside the factory image and then open the image zip file inside the factory image. Give this a second to extract an open.

And we’ll also open up the factory image. Open that up and open this folder inside the factory image and then open the image zip file inside the factory image. Give this a second to extract an open. Okay. And once you see all these other image files inside the images. It is fun and needs to extract the boot image outside, and that’s all we need to enclose that. And we can also close the original factory image zip file.
To begin, we’ll install the USB drivers. So let’s open up the USB, drive a photo, and you can do this even if you already have these installed. It’ll just replace them or update them, or if you don’t have them installed at all, this installs into your system. So finally, “.INF” file right-click on it and click on install. You may have to accept user account control prompts here. Just click. Yes, and you can always trust the software from Google LLC and then click on install. And that should do it by itself. And you’ll see we have an operation completed successfully here, which is good news, and we can go back out.
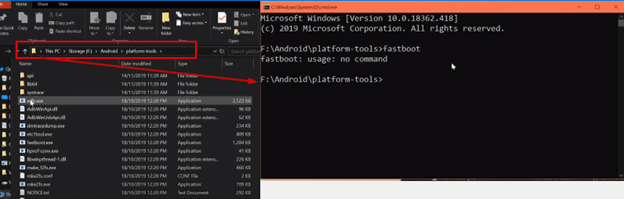
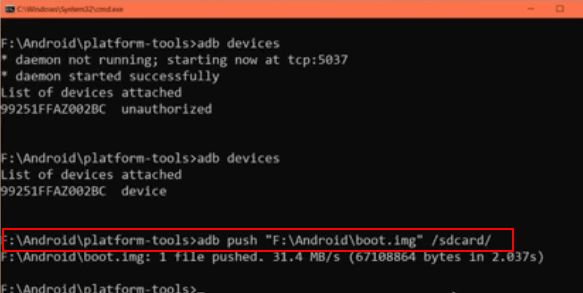
Now we need to open up the platform-tools folder. You can already see fastboot and ADB in there. And we need to be able to run these programs in our command prompt window or PowerShell window if you want. So here we are going to be using the command prompt for this. Now, you only need to change the path in command prompt to where your files are; mine is in F Drive. See image below for a better idea.
Powers hell Commands
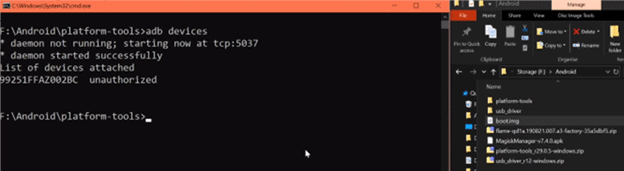
To start the process, we use the command prompt here, and we’ll use ADP to push the image that we extracted from the factory image, and we’ll push it to our phone using ADP. So this is essentially copying it to our phone. Instead, we’re not using the ADP protocol. So to do that, we’ll start off by typing in ADB devices and let it start the ADB, Damon. You’ll see that run. And on our phone, you’ll see that we’ll need to accept USB debugging prompt. Check images below.
Make sure your Command Prompt path is equal to the actual file saved path. Type “adb devices” to start.
You should get the below message on your Pixel 4, hit “Allow.”
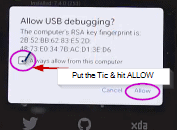
You must select “always allow from this computer” so that you don’t have to repeat this prompt every time your phone reconnects. And if you saw it on our computer, it said our device was unauthorized. Once we accept that prompt and we rerun the same command again.
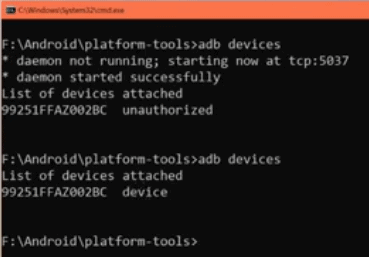
we should see that our Pixel 4 is now listed as a device. So that’s good. And now we’ll push the image into onto our phone SD card. So let’s type in ADB push and then the file we want to push.
So once we’ve done that, we can head back to our phone, and hopefully, you have Magisk manager open as well. And what we’ll do here is tap install.
And this version of Magisk is fun. What’s happened is install again. And then, we’ll need to select the option, select and patch a file, allow Magisk manager to access your files here, and to access our internal storage through the files. Manager will need to go to the three dots and tap on show internal storage.
Once you’ve done that, we can head over to the menu and we should see pixel fall on the side, and then we’ll see the boot image that we just copied over using ATP tap on that and Magisk will start downloading the installation zip file for itself. And once this is done, you’ll see it patched the boot image that we provided. Now, this is the first step to installing Magisk on our phone. So you’ll see that it is installing it to the boot image. Just give it a few moments here and done.
You also see that as output into this directory. / storage / emulated/ 0 / download/ magisk_patched.img
So, using the information shown on the above path we can call that file to the computer to pull that file back onto our computer. So let’s do that. We use the command “adb pull /sdcard/download/magisk_patched.img ..”
It should look like

if you are doing things in different folders you can drag and drop here, and it will copy it there as well. OK. So once you have pulled the “magisk_patched.img” back to your computer, you’ll see it in the Android folder which is good. We can now head over to our phone. And this is where we’ll actually be able to unlock the bootloader now. Now, keep in mind, this will wipe your device. So please be careful with anything that you might need to keep on there.
So make sure you back that up immediately before you go ahead and unlock the bootloader. But to begin, we’ll need to go into the bootloader. And to do that. Let’s power off our device and disconnect the USB cable just to make it easier for us to do so. And once you’ve done that, I want you to hold power and volume down on the device here. And this will boot often into the bootloader. It will look like the below image.
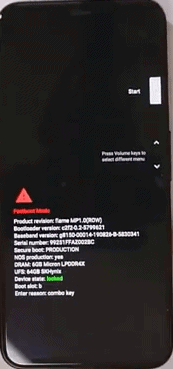
And this is where we can also plug in the USB cable again. And you can see that it is in fastboot mode, which is good. Now you can also see that the device that is locked and that’s in green.
We’re going to change that very shortly. OK. So once your devices in the bootloader or fastboot mode, you will now be able to type in this command “fastboot devices”. Now, here is our device in fastboot. And if you don’t see anything here, you’ll need to check up on your device manager.
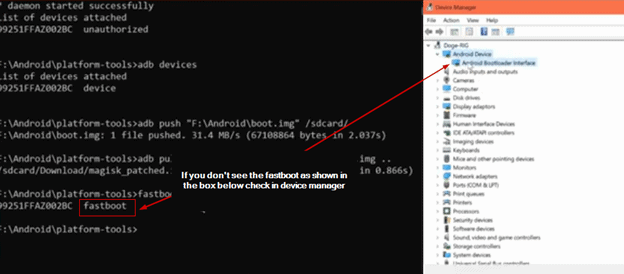
If both options are not showing maybe yours is under something called Li Mobile Android device, which is okay as well as long as it shows up. But if it doesn’t show up, most likely your device will be somewhere under unknown device and hopefully, it says Android or something like that. You can right-click on it and update driver and then hopefully you can browse your computer for a driver.
Hoping that your device is connected now, we can go ahead and unlock the bootloader and the command to do that is “fastboot flashing unlock” now hit enter and you’ll see that the prompt in your device has changed. Refer image below.
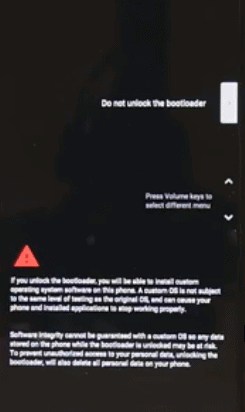
The message is just saying that your security goes down a little bit for the added fun. So what we can do here is change the option with a volume up and up and down buttons. So let’s say unlock the bootloader and press the power button to confirm and our device will hopefully reboot back. It’s into the bootloader. And it should say unlocked in red color at that point. What we can do here is select start here to boot up once. And this should also wipe the device. There will be a message showing up every time you restart your phone. This will add a few seconds to the boot-up time, but this is just a warning saying that your bootloader is unlocked. So don’t worry about that and we’ll just let that resume the boot sequence.
And you can see our device has reset itself. And then what we can do after this. So you can set this up normally unless flashing a custom ROM or something. You should be able to use your device as it is routed right now. So I’m just going to skip all the stuff and we’ll head back to reading the device once we’re done. Ok. So I’ve just finished setting up the phone.
Everything is a brand spanking new. No apps at all. But that’s all right. What we’ll do now is reboot our phone into the bootloader and flash that magisk patched image that we pulled from our phone before we unlock the bootloader. So that we’ll be able to let us root our phone. So let’s do the same thing. Instead, we can actually tap on, restart and hold volume down when the screen turns black and keep holding that and your phone will actually boot into the bootloader in just a few moments. There we go.

So once your friend is back in here, let’s head back to our computer and use our command prompt here. We’ll type in “fastboot devices” to make sure our devices connected properly. And that’s good. And then we’ll use a flash command to install a flash of this image as our boot image since it was derived from the boot image. So let’s do that. Let’s type in “fastboot flash boot F:\Andriod\magisk_patched img”. And hit enter, that will send it to our phone.
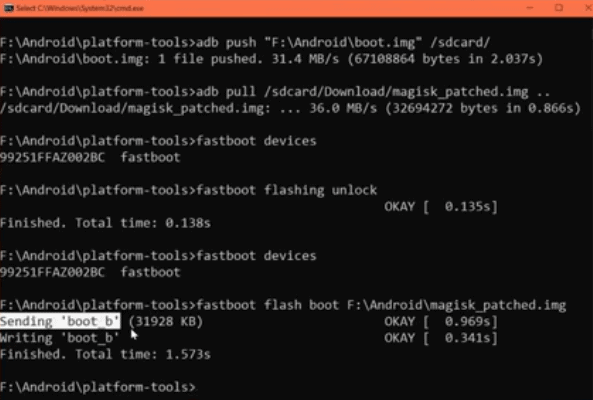
If you check the above screenshot, you’ll also notice that mine is displaying “sending ‘boot_b’. That’s because I’ve taken one. OTA, update, because your phone always stuck on the A side and then every update sequentially after that or subsequently it will keep flipping the sides. A, B, A, B, A, B. That is just how they do the updates so seamlessly. So just keep that in mind. Whatever you’re currently on is fine by me. So as long as you can flash the boot image, that’s cool. We can type in “fastboot reboot” hit enter and that will restart our phone back into Android.
And in due course, we should see our phone turn on hopefully with Magisk manager installed. If not, we can just download that again. But our phone should be routed using Magisk and we should be able to pass safety net. And I’ll share some, tips on what you can do to hide Magisk and Magisk manager quite well from apps that are trying to detect our device. So devices turned on let’s enter in PIN and hopefully we should see Magisk Manager pop up If not, of course, as I mentioned before, we can install Magisk manager and that’s fine as well. So I’m just going to download it from the same Web site as we did before. And let’s download that. We’ll save it. And we’ll wait for this to download.
This time you will feel it’s much faster. Which is nice. And then we can tap on it to install. We’ll need to do all our settings again and install Magisk manager. Hit open it, it should say we are up to date and they’ll also ask you “Require Additional Settings” Hit Okay. We’ll let Magisk do its environment setup, which is quite important. This will allow you probably to install modules and to make sure everything is working just as it should be. So we’ll give that a moment for it to download Magisk and then also do its additional setup. So that’s good. And also restart our phone, it seems like, in five seconds.
Okay, we’re back on line here. Let’s just head on in. OK. Magisk manager. That’s cool. Let’s open that up. Everything is fine. So let’s have a brief tour of Magisk manager. Magisk is just the main menu. Show you any updates and also any settings that you might need to do or have. You can also check for superuser requests and manage those, so Magisk Hide is probably where we want to get started or you’ll probably be most of the time, maybe apart from the module’s page.
But here it will have a list of all the apps that you will have on your phone. Doesn’t include system apps, but you can check that from top right corner. But basically what this does is once you check the app that you want to hide, for example, Google Play Services and this is the default selection. So I’d leave that. But in case you have, say, for example, Pokemon Go Ingress Prime, maybe Snapchat or your banking apps, Google Pay, they’ll also show up here and you want to add those. So take those. And the second cool thing is the module section. So downloads will show you all the downloads that you can install from the Magisk repo. And this will include mods like Exposed and also things like active edge sense mod.
Hide Magisk manager is something that you’ll probably want to use right away. Do that right now and this will allow you to rename Magisk Manager and also give it a randomized package name. So apps that look for something called Magisk Manager or they look for the app with something like com.topjohnwu.magisk manager. It won’t be able to do that. And what it does, it will repackage it into manager.
Apps like Pokemon go search for strings or names such as Magisk Manager and all that, which is annoying. But this is a way to circumvent that, which is pretty awesome. So I have no doubt that you’ll be able to run the apps that you usually use and the banking ones and Google Pay as well using Magisk and Magisk manager combined. You can also change the update channel, if you want to use more recent builds such as beta builds or even Chenery builds, which you can do yourself there.
And last thing I want to cover is some of the options that you need to change in the, developer options. So we’ll need to enable that again. So let’s go to about phone and enable the developer options. Right. That’s good. Let’s head over to system now and head over to the developer options. OEM looking is enabled and that shouldn’t allow you to disable it since the bootloader is already unlocked. So I would leave that enabled. Don’t touch that.
The next thing I want to turn off is the automatic system updates. We don’t want that because that may unroot your device in the middle of the night, which is not fun. And I guess you want to enable this again if you plan on using ADB. And this is always quite handy to have enabled anyways. So I tend to enable that. And we’ll probably get an authorization prompt again since our computer is still running the ADB, daemon. So I’m going to allow that and that’s fine. So that’s it. Your phone is now rooted and able to install modules of all sorts, which is amazing.
If you have any questions feel free to leave it down below in the comment section, And as always, happy flashing.
Following articles may be useful :
Checkra1n iOS 13 Jailbreak Compatible Jailbreak Tweaks – Article 01
*Checkra1n iOS 13 Jailbreak Compatible Jailbreak Tweaks – Article 02
Checkra1n iOS 13 Jailbreak Compatible Jailbreak Tweaks – Article 03
Unc0ver jailbreak added iOS 13 – iOS 13.3 Jailbreak A9-A11 devices support