

Last Updated on 3 years by admin
In our previous posts related to Android Enterprise we discussed how to add a device to Meraki Dashboard. That was the 1st step towards setting Android For Work setup. The next step is to set up the Android Work Profile. This also can be done through Meraki Dashboard.
Note — Meraki Mobile Management system is just one way of setting up your Android device for Android for Work. There are many more applications similar to this. We tried some of those competitive products, but Meraki felt more comfortable during the entire process. And that’s the reason we thought of sharing our experience. This is not a paid post to get customers for Meraki. Also, the profile feature is available for iOS for Work and Windows as well. However, we are only considering the Android profile on this post.
Why you need an Android Work Profile.
Android work profile is the key thing for Android for work. By creating a profile, you can divide your work and personal apps / data separately. It also provides full access to the organization over files, apps, and policies saved under the work profile. And protects the privacy of personal data saved under personal profile.
If you reset your device and join with Android for Work as we guided in the previous post, then there will be no personal data. But if your setup is Bring Your Own Device (BYOD) then you will notice what’s explained.
Benefits of using Meraki Profile with Android For Work
Meraki always simplifies the process and adds more features. The same is applicable for the Android Profile as well. When creating an Android work profile, with Meraki it gives you more control over the process.
Few of the features available in Meraki Dashboard for Android Profile.
- Assign users to remove work profile or block with a password.
- Allow / Block using internal camera, installing apps.
- Push password policy.
- Allow location / SSID tracking.
- VPN Settings.
- Managed App Config.
- Android App Permissions.
- Android Wallpaper & Lock Screen Message …etc.
How to Create Work Profile on Meraki Dashboard
Here are the steps you need to follow. If you are not sure how to create the meraki dashboard login, check our previous post.
- Login to Meraki Dashboard
- Navigate to Systems Manager > Settings

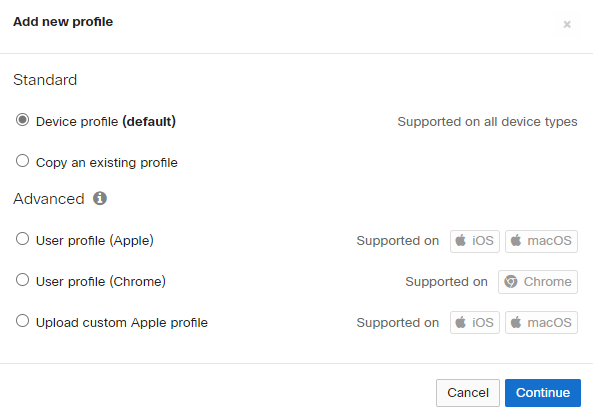
- Click on Add Profile and select one of the below options. For better understanding we choose the default option. Then hit continue.
- Next, provide a name for the newly created profile, update the description. Also, you get to choose whether the users can remove this profile or whether it is password protected. Below image will support your understanding.
- Once you are done with the above selection go further down until you see “Scope”. We will talk more about this further. However, in short this is where you need to link the devices that need to adhere to this profile. If all the devices in your dashboard need to comply with the profile you should select “All Devices”. Or you can tag devices to the profile. Since we don’t need to mess with the devices until we are finalized with the profile select “No Devices (disabled)”. Then hit the save button from below.


This completes creating a blank profile in the meraki dashboard. The blank profile should look like the image shown.
Adding Settings to the Blank Profile
As we described under “Benefits of using Meraki Profile with Android For Work”. There are many features that can be controlled through the Profile. These are easy to understand.
Here are the steps to add one setting to the profile.
- Click on the profile that you recently created by going to Systems Manager > Settings, in the Meraki Dashboard.
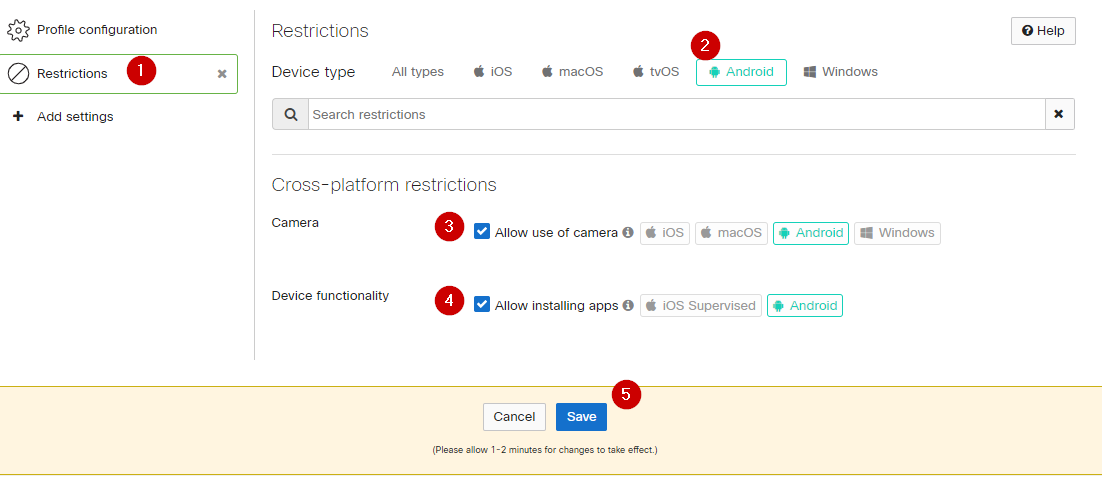
- Under Profile Management select + Add Settings
- Now, select one of the options from the list displayed. For this example, we are using the 1st option called “Restrictions”.
- From the device type on top row select Android. It will only show the available feature for Android OS.
- Check for the available options and select or deselect the options and press save.
You can follow the same process for all listed settings.
Tip — you do not need to add all settings. The selection is totally based on the restrictions or the control that you need to be deployed on the android devices.
You might also like to checkout our following articles:
Android Enterprise – Everything you need to know
Jailbreak Updater – update to the Odyssey / Taurine jailbreak while already in a jailbroken state
Reminder – Today is the last day to use the OTA trick to update to iOS 14.3!