
Last Updated on 2 years by admin
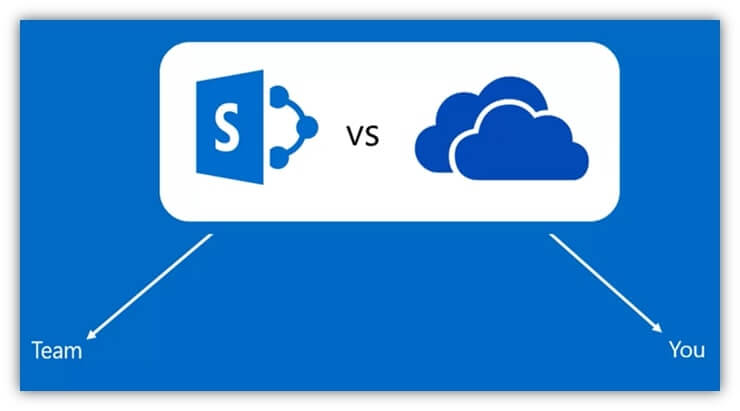
In general, SharePoint and OneDrive are both cloud storage facilities provided by Microsoft. It is provided as part of the Microsoft 365 license. Most Organizations and Education centers use SharePoint to store commonly accessed documents. Also, they provide exclusive access permission to selected users or groups depending on the requirement. This also provides access to the selected users/groups to share documents with multiple teams. Since the folder structure in SharePoint is created with predefined access levels it is much secure in file sharing within the organization. Let’s check how we can effectively use SharePoint and OneDrive.
Use OneDrive to back up your laptop work files
With the release of OneDrive for Business, people started to use it for different purposes. However, recently OneDrive became the backup media for Laptops. Organizations were able to save a lot of cash as they no longer needed alternative online backup software. Microsoft cloud storage OneDrive is much more user friendly than the competitive software’s which was commonly used in the past.
Example: Blackblaze was a well-known cloud storage in the past. But it uploaded everything to the hard drive. Which is not practical in most cases. Also, the restore option was complicated. In some situations, we had to get the backup shipped in a USB when a hard drive crashed. Also, an extra payment was required for this feature, and it took time depending on the shipping.
Most efficient way of using MS OneDrive as your device backup is to configure automatic synchronization for the main folders. This can be decided by the IT department of your organization. Most common method is to synchronize Documents and Desktop with OneDrive. But if you are dealing with images and videos, you can set those folders to auto sync as well.
Unlike other backup software’s the OneDrive supports online access of Word, Excel files therefore even if there is a sudden breakdown of a laptop the user can use any device to access the OneDrive through Office 365 and work directly on the web. This feature allows you to work from anywhere that has internet connectivity. There are similar alternatives for OneDrive created by other Providers but in this post, we will be focusing on OneDrive.
How to Configure OneDrive to Back up your Laptop/PC
Configuring OneDrive to Back up your selected folders is extremely easy.
- Install the OneDrive application on your Laptop/PC
- Login with your credentials.
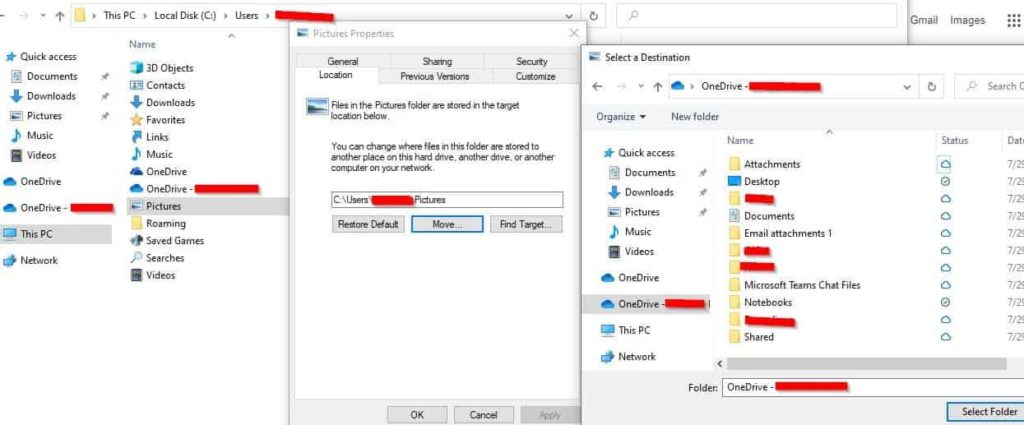
- Assuming that you need to back up your documents. Goto C: drive and select your profile.
- Under main folders in your profile look for “Documents”
- Right Click on “Documents” Click “Properties”
- Then click on “Location” Tab
- Using “Move” Button browse and select a folder inside OneDrive and click “Select”
Now your documents will move to a folder inside OneDrive which will allow the files within the folder to sync with OneDrive.
Methods of Synchronizing OneDrive
As mentioned above, if you have configured OneDrive to automatically synchronize the Desktop and Document folders then this section will be valuable for you. The main purpose of synchronizing files with OneDrive is to have a backup of your work files. Therefore, everyone should save important documents in these folders.
- OneDrive Files On-Demand – This option helps you access all your cloud storage in OneDrive without having to download all of them to your laptop. This feature reduces the usage of your local hard drive.
- OneDrive Local Storage – If the Files On-Demand option is not selected all your files will be stored in your laptop as well as in the cloud. This option uses hard drive space similar to the cloud storage space.
Note – If your internet connection is slow or if you work offline most of the time it is recommended to use the Local Storage option.
Here’s how you can enable/ disable One- Drive On-Demand File access – Click to view the Video or check the step guide below.
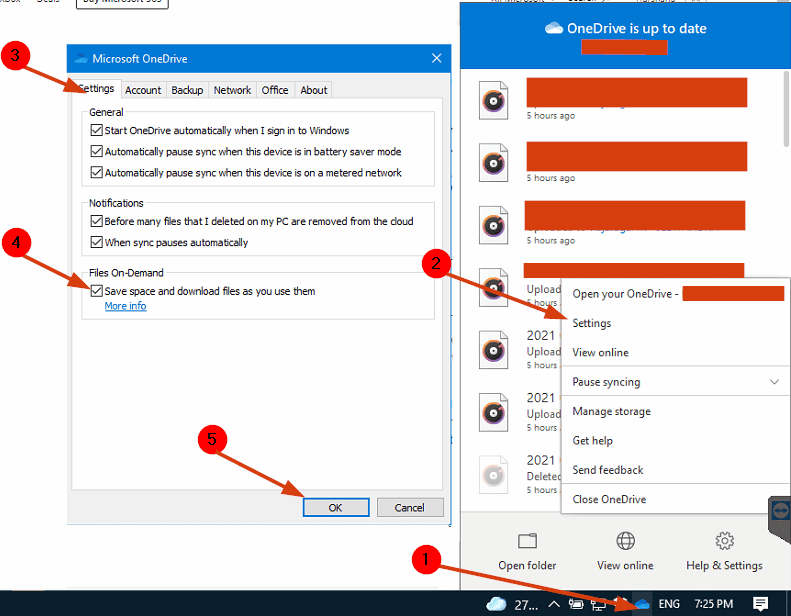
Status Shown by Icons
If you have Files On-Demand enabled, you’ll see new status icons next to each of your synchronized files. Here’s what each icon means.
| Save space on your device by making files online-only. These files are only available when you’re connected to the Internet, but don’t take up space on your computer. | |
 | When you open an online-only file, it downloads to your device and becomes locally available. You can open a locally available file at any time even without Internet access. |
 | To make a file always available, even when you’re offline: Right-click it and select Always keep on this device. To change a file back to an online-only file: Right-click it and select Free up space. |
Move files and folders between OneDrive and SharePoint
As we know OneDrive and SharePoint are part of Microsoft 365 products. Therefore, moving data from one cloud to another within the same provider is very efficient. Moving files from OneDrive to SharePoint online does not depend on your connectivity speed. and it doesn’t use your broadband data.
Example: if you move or copy files from one folder in your local hard drive to another does it require broadband data? Does the Speed depend on your internet connection? The answer for both questions is NO. Moving data from OneDrive to SharePoint is also like moving data within the local hard drive.
You can use this option to share files with a different team, or even give other teams ownership. You can move (or copy) files and folders from OneDrive to SharePoint, from SharePoint to OneDrive, within a SharePoint 365 site, or between sites. This also allows to move files from someone else’s OneDrive to your own OneDrive.
Let’s try out how to move files from OneDrive to SharePoint
To Move/Copy files or folders you need to access to Web interface of OneDrive
Step Guide
- Select the files or folders that you want to move, and then select Move to
- Under Choose a destination, select the location you want to move to. Sites appear under the name of your organization, such as Contoso in this example.
Note -You’ll see different locations depending on where you are. For example, if you’re on a SharePoint site, you’ll see your current library, your OneDrive, and other sites. You might have to select Browse sites to see the site you want. - Select the location where you want the items to go, then select Move here to start moving the items.
Within a few seconds you will see the files in the new location.
Provide File and Folder Access to External Parties
This option is useful for team members who work with External parties (Outside your organization). Most often Marketing Teams and Designers widely share or receive files from external users. Most of them use free services like WeTransfer for large file sharing. If we practice using the services we own, we can reduce the risk of viruses and other potential threats.
How to Share Files & Folders with External Teams
Note- Files/Folders can be shared with Read Only Access or Full Access
Step Guide
- Right Click on the File or Folder that you need to share with external parties.
- Click on Share
- Select “anyone with the link”
- If you need to allow edit access, select the “Allow Editing” check box, you can also set an expiration date for the shared file/folder and protect with a password. (This password needs to be shared with the external user- best practice is to use a different media for password sharing. Ex- If you email the share link, Text the password)
- Hit “Apply”
- Use the “Copy Link” option to copy the link and share it with the external user/team.
There is also an option to share files/folders with specific people using any email account, however with my experience this option hasn’t worked well in the past. Therefore, stick to the “anyone with the link” option with a password. It is less complicated and works all the time.
Hope this post was helpful. Also, if you have any questions, please contact me through the comments section below.