
Last Updated on 3 years by admin
Xcode integrates everything developers need for Apple application development. Since the first release that took place in 2003, Apple has released many versions to support its development. Current latest version 13.2.1 it was released on 17th December 2021.
What is Xcode
Apple uses Xcode as the integrated development environment. Developers find it as the key component for iOS, iPadOS, TVOS, Apple WatchOS and MacOS app creations. It also works as a single platform for initial designing, coding as well as testing and troubleshooting.
Minimum Requirements & Supported Software Development Kits
Apple has a detailed chart describing the x code version along with the supported Mac version. As an example x-code 11.4.x to 12.4 supports macOS Catalina. 12.5 to 13.2 support macOS Big Sur. The complete chart can be accessed from the linkhttps://developer.apple.com/support/xcode/
Download Xcode
It is free to download through the Mac App Store. However, if the previous versions required, registered developers could use the Apple developer website. For the development purpose Xcode can be used as a CLT interface which runs through command lines. This takes advantage of the Terminal App which is on MacOS.
More about the latest version 13
Time to time updates to Xcode have built it to perform outstanding team tasks. The latest release adds more team development features. Also, it supports integration between Xcode Cloud, GitHub, GitLab, Bitbucket.
Furthermore, developers can view team comments within Xcode. This makes it the most futuristic platform for Apple app development.
Xcode 13 Features
As mentioned above the Version 13 of X code was released with many features that support developers.
- Comparing two versions of a file – the quick compare option makes it possible to check and compare two versions of source code without disturbing the current editing content
- Comment among the team – Code editor keeps visible of the comments made by your team during the process of review
- Bottom Bar – All useful information is kept visible in the bottom bar. This includes line, column info and quick access to other options
- Vin Mode – Edging and Key combinations for VIn Users are now supported directly within the code editor.
- Simulator for CarPlay – This is one of the coolest features in Xcode 13, the developers get to test the application using the CarPlay Simulator on different car platforms. Which also makes it easy to identify correct screen size, resolution and other variables
- Crash Reports and Feedback – TestFlight Crash reports now appear on Xcode in moments after the test. Which helps the testers to clearly communicate the errors that occurred during the crash. Also, log display inline simplifying the developers’ tasks
- Cloud Signing – Just by signing into your Apple ID apps can be code-signed using Apple-hosted services which manage your certificates. This makes the submission of AppStore apps much reliable and easier
How to Install Xcode
Installing X-code can be done in a few different ways. The easiest method can be simple as download and click next, next until you see done or complete. However, in this post we will be guiding you with all possible methods of installation.
Before going ahead with the installation guides it is important to know which operating systems are supported. And the hardware requirements
- X code supports only MacOS. If you are on a windows PC/ Laptop, then it is not possible to install the application. However, if you are so keen on testing it on Windows then you can try https://checkout.macincloud.com/. They offer plans starting from 1$ per hour. This is a total xcode cloud base solution (xcode download for windows not required). Other option is to use an ios simulator. this will work as a virtual Mac
- X code download file size runs up to a couple of Gigabytes. Therefore, it is advisable to have a stable internet connection to avoid interruptions. even the xcode 11 download takes 10 – 15 mins on a stable connection.
- Your free disk space on iMac should be 30GB or more (version 13 may need around 40GB). As most developers mention it is better to have more space depending on the project that you are going to work on
Overview of X-code installation
- Download Xcode
- Install CLT (command line tool)
- Open Xcode
- Move/ Delete downloaded files
Download Xcode – Method 1
This is the easiest process to install XCode.If the installation process completes without any issues, then you are lucky. However, since there are some known issues that users face during this method of installation, sometimes it could be complicated. The reason for the complication is that troubleshooting for this method isn’t easy. Most of the time you may need to redo the installation process to overcome simple installation errors.
Go to the Mac App Store following the usual sign in process. Search for Xcode and download. Now click on install. If you have a previous version installed, you should get the option to update.
XCode Download – Method 2
This could be the preferred method for most developers and here’s the process.
- Visit https://developer.apple.com/ sign in using your Apple your Apple ID
- Select the version that you prefer to download. Since the file size of Xcode could be larger it took a while to download. However, the time depends on how stable and fast your internet download link is. Also, the download file size of version 13 is around 12.5GB
- Next, you need to click on .xip to extract the file. Usually it extracts to the same folder where the original file got downloaded. This process may take a few minutes however, you don’t need to follow any extra steps other than clicking the above mentioned file. It is recommended to rename the file once extraction is complete
- Drag the extracted application folder to Applications folder
- To enable the current version as the default Xcode version, open the terminal window and type
sudo xcode-select -switch / Applications / Xcodex.x.x.appd. (Xcodex.x.x.app needs to be replaced with the current Xcode version. Example: Xcode13.2.1.app)
Install Xcode on CLT mode. (Command Line Tool) – Method 3
Visit Apple developer web and look for Additional downloads. Under additional downloads click on command line tools & older versions of Xcode. Next, provide login credentials and proceed with the download by selecting the required version. Once the download completes click on the .dmg file and follow the screen instructions.
Once the installation is complete go to the Terminal App and use the below commands.
Find out whether X code CLT is installed
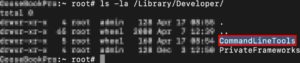
By using the code ls -la /Library/Developer/ you can identify whether Xcode CLT is installed. If you see a Command Line Directory that means CLT is installed (folder display as “CommandLineTools)

Command for selecting X-code version
xcode-select --version This command will tell the Xcode version you are on
If you see an error “ no developer tools were found, and no install could be requested (perhaps no UI is present), Visit ‘developer.apple.com’” and manually install Command Line Tools

Manually install Command Line Tools
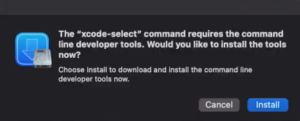
Here’s how you do it: xcode-select --install

Now you should see a pop screen requesting to install command line developer tools. Follow the screen instructions to complete.
Type in the command ls-ls /Library/Developer/ now you should see the folder display as “CommandLineTools”
Uninstall Command Line Tools
Use the uninstall command with extreme caution, a simple error could delete everything from the hard drive.
rm -rf /Library/Developer/CommandLineTools

How to delete unused Xcode files to save hard drive space
There are 3 ways that you can save space by removing unwanted files.
- Uninstall unused older versions of Xcode from your Mac Computer
- Delete the download
.xipfile version - Delete the
CLT.dmgfile
In this article we have covered all possible methods of Xcode installations. Which includes graphical interface as well as command line tool installation.