
Last Updated on 4 years by admin
Microsoft Power Automate sounds like a complicated name. But it is a terrific way for automating daily tasks without any knowledge about coding. We plan to simplify the process and guide you on how to use Microsoft Power Automate with most useful examples for your busy work life.
What is Microsoft Power Automate?
Microsoft Power Automate can be identified as a package that supports you to create automated workflows among your favorite applications and services to sync files, get notices, gather data, and more. Simply Power Automate helps you automate manually performed daily tasks. The best thing about power automate is power automate Microsoft programming language is just drag and drop. Users of MS power automate does not need any programming skills. Also, there are plenty of pre created templates for you to choose.
Frequent questions that people look online about MS Power Automate
While you were googling about power automate you might have noticed questions like
- What does power automate do?
- What is Microsoft power automate used for?
- MS- Power automate pricing
- MS Power automate login
- Examples for Microsoft flows / Power automate examples
- Power automate excel
- Power automate SharePoint
We will be covering all above questions in this post. Already, we have given you the insights about What does power automate do? And hope you have a clear idea about it. Anyhow, with the coming examples and how to guides you will have a better understand about Power Automate.
MS Power automate pricing
Since everyone seems to be concerned about the cost that they need to go through to get the tasks automated, we thought of sharing the prices.
For beginners, Microsoft have offered a 30-day trial for Power Apps, and that’s just the beginning of free trials. MS offers a 90-day trial period for Power Automate (Microsoft power automate free). Thats awesome right? 90 days is more than enough to configure and try out the automated tasks that you have in mind.
If you are company admin Microsoft 365 lets you buy Power Apps plans for their teams or organization. Contact your Microsoft 365 admin when you’re ready to buy. If you’re lucky you might get a discount.
Standard power automate pricing
| Per-user plan | $15 |
| Per-user plan with attended robotic process automation (RPA) and AI | $40 |
| Per-flow plan | $500 |
Checkout the package comparison and additional details through the official site
Microsoft Power automate login
Just like Office 365, power automate login is possible through office.com. However, some organizations that has many web applications think users can’t keep track of all the passwords and they join hands with single sign on applications like OKTA. If you or your organization users a single sign on application, then your access link to MS power automate may differ from the above. Check with your IT person for more details.
Off the topic –
If you are a regular follower of our posts, you might have noticed the word Single Sign on / OKTA in most places. The reason is with the increasing trend for web apps / applications, most companies think they are complicating the users with multiple passwords. As a solution they prefer choosing the Single Sign On solution providers like OKTA. Which is a cool way to have access to all your work apps from a single login. If you are an Admin you may need to try that as well. It will save you time from supporting users to reset forgotten passwords in multiple applications.
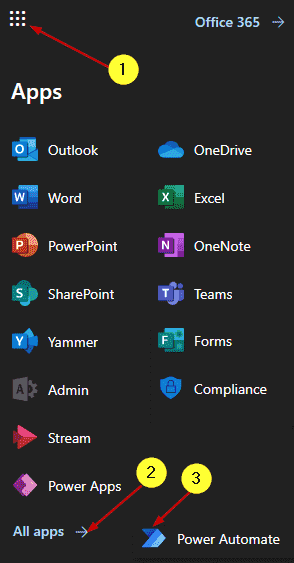
Once you access the office.com using your paid or trial credentials you may not see the power automate flow at once. To access power automate you need to click on the nine dots on the upper left corner of the office.com page. Some people call it as the waffle icon as it looks pretty similar to a waffle. Then click on the All Apps which is displayed in the bottom left, right below the waffle icon. Then you should see power automate in the displayed app list. Recommended to access office.com through a PC / Laptop. Check the screenshot for a better understanding.
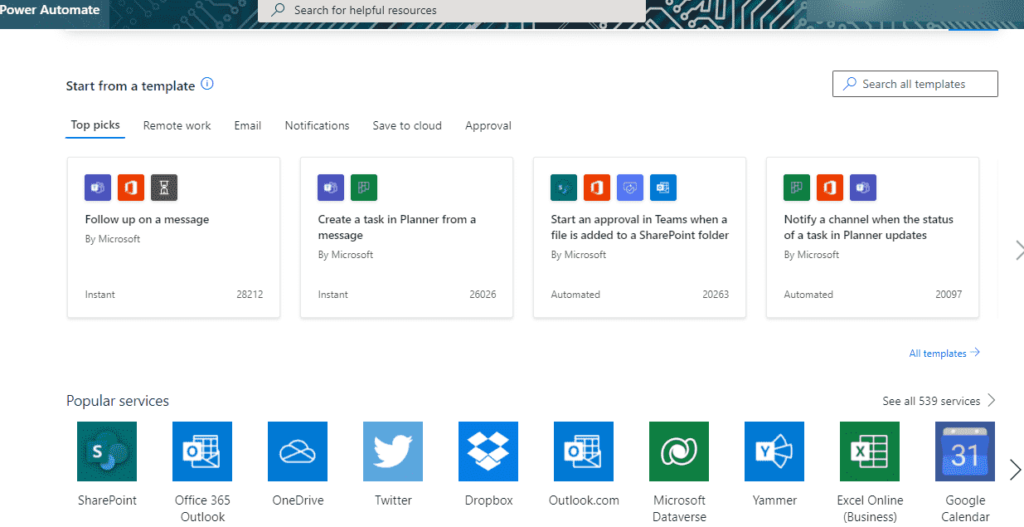
Once you reach the Power Automate page it should display as below.
What does Microsoft power automate used for?
Microsoft power automate can be used in many ways to simplify the manual tasks that you have been doing. As you may have noticed on the above image MS power automate comes with pre- created templates that can match most of your needs. Most importantly, MS flow also supports linking the automation process with most popular services. At the time of posting this article, there are 539 services that can be linked with Power Automate. These linked services keep on adding new features. Therefore, we could automate more tasks with the support of new services. On the other hand, the investment for power automate Microsoft is never a waste.
In this post, we will show you on how to create a power automate flow using a template as well as from the scratch. But before we get started, there are some key areas that we need to cover from the login page.
Getting familiar with MS Power Automate Main Page
Getting familiar with the main buttons on the power automate will help you while creating power flows. Therefore, check the screen shot for understanding the commonly used buttons.
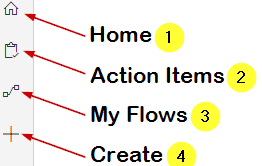
- Home – Takes you to the MS Power Automate home page. It will show the popular templates, available services etc.
- Action Items – Approvals and business process flows
- My Flows – Displays all flows that you have created
- Create – Allows you to create a new flow
Power automate example – How to create a MS Flow
As the first example, we will check how to automate and email when a YouTube video is uploaded to a selected channel. If you work in social media marketing and if your management has requested you to share all newly uploaded videos with the client base through email, this is a great tool for you. You will never miss sharing the emails in future.
Fist we will use an existing template to automate the task.
- Go to MS Power Automate – If you are new to MS Flow, follow the login process which was shared above
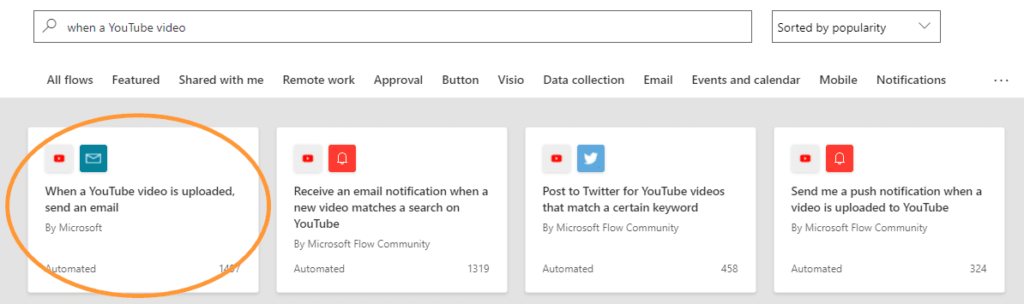
- While you are on the Home Tab search for the template “When a YouTube video…” In the results you should see the “When a YouTube video is uploaded, send a template. Click on it
- Now it will display the template as below
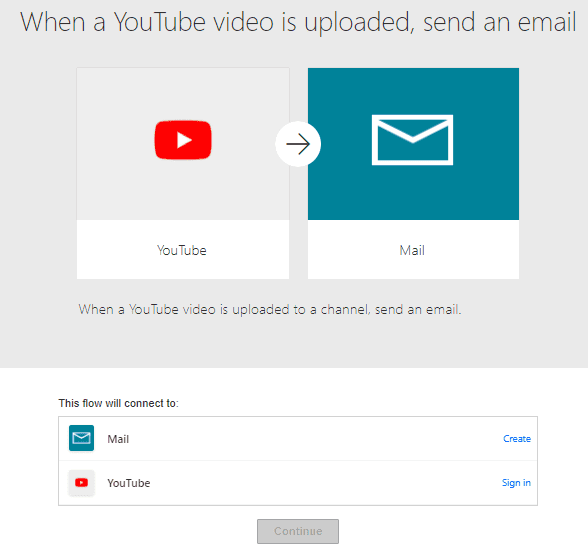
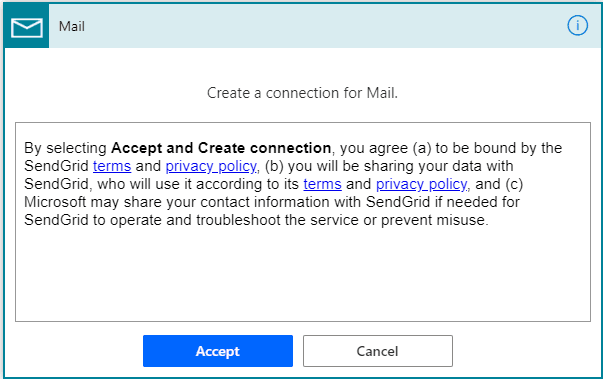
- Under this flow will connect to section click Create which is in front of Mail and accept the popup window
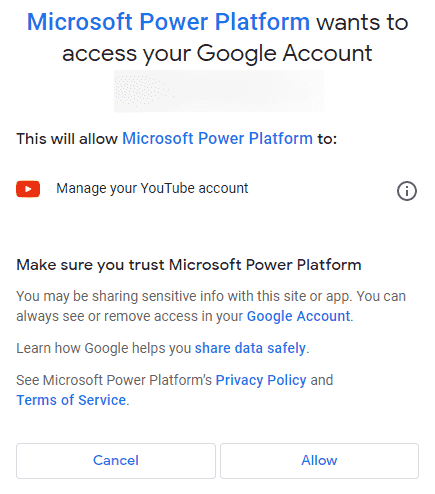
- Next, Sign-in to YouTube. You may need to follow the instructions displayed in the popup windows
- To send email alerts we need to specify the channel name which you are uploading YouTube videos (suppose you have two YouTube channels and the customers / clients that needs to be notified depends on the channel name this feature will help you create more MS power automate flows to support the need)
* To – Type in the email address, addresses or the email group that you need to notify about the latest videos
* Subject and Body – Text displayed in the Subject line and the body section can be dynamic.
You can type the static text in the subject line and select the dynamic video channel name from the dynamic content box.
Follow the same process for the Body section.
- Finally, click on save. If you visit the “My Flows” section, the newly created MS flow should display as seen below

This completes creating the Power Automate flow “When a YouTube video is uploaded, send an email” you can test the MS flow by adding a video to YouTube. For best practice enter only one email address to the send email list for testing. Ideally the test email can be one of your colleagues who can support you with the testing process. After that, you can add all emails to the list if the test is successful.
Since it is the first example before going forward with new flows, it is better to build some confidence on using MS Power Automate without the help of pre-created templates. Therefore, we will try the same example again from the scratch.
Since we are trying the same example “When a YouTube video is uploaded, send an email” we need to avoid creating duplicates. So, let’s delete the previous flow.
How to Delete a Microsoft Power Automate Flow
Login to office.com / office365 web portal, go to all apps, then look for “My Flows” from the left-hand side bar. It will list all the flows that you have under your login. Then, select the flow that you plan to delete. Go to the three dots. Finally click delete from the drop-down list.
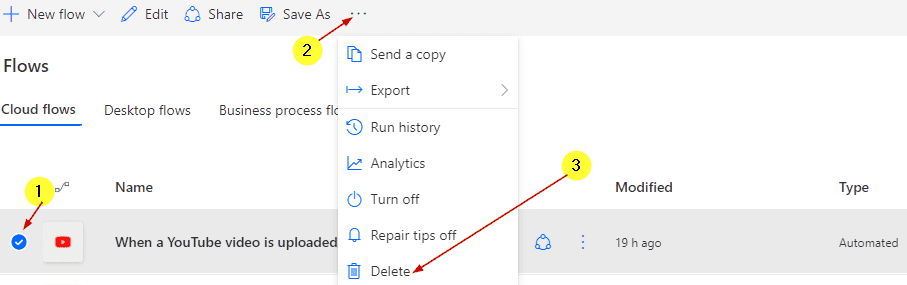
Confirm the deletion by clicking Delete Button on the popup window.
And that’s how you delete a MS Power Flow.
Creating a Microsoft Power Automate Flow from the scratch
Login to MS Power Automate. Click on the + button/ create button to create a new flow. Select “Automated Cloud Flow”.

Now, in the newly opened window give a name for the flow. For Example, I have entered “YouTube new Video alerts to email”

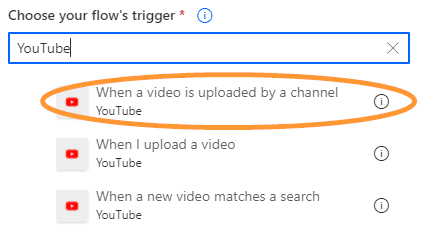
Next, we need to select flow trigger. Since the trigger we are using is related to YouTube. Type YouTube on the search bar. It will list all available triggers. Select the trigger that supports the requirement. In this case it is “When a video is uploaded by a channel” if you don’t need to choose video by channel then you can select the second option.
Click Create button.
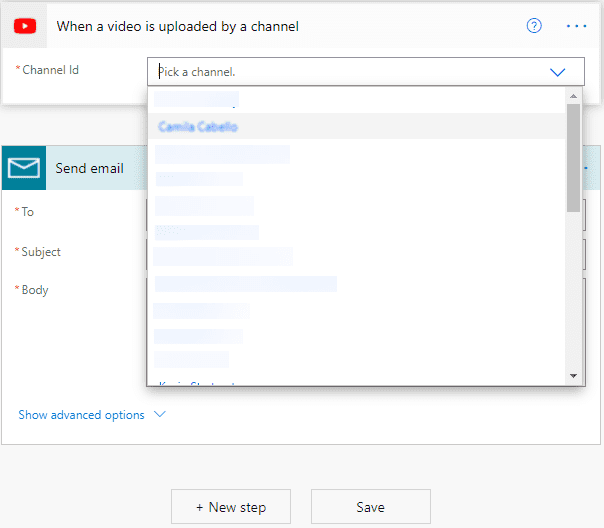
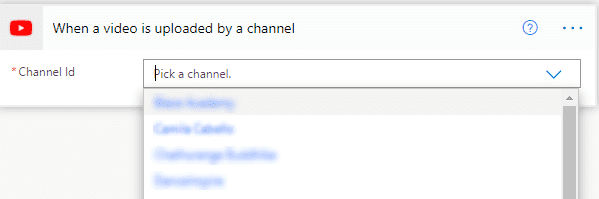
Select the channel that you need to be triggered
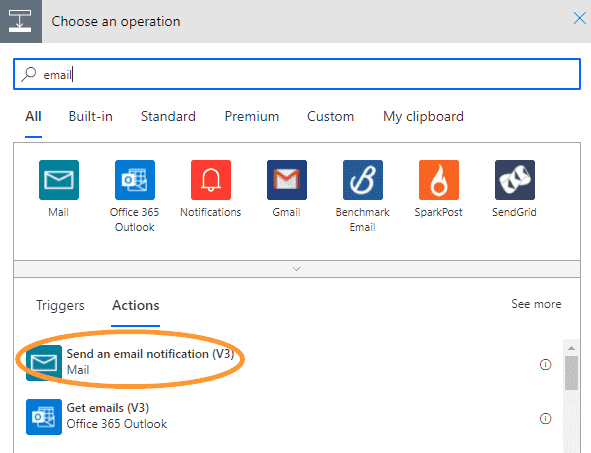
Click on New Step, which will request to choose an operation. Remember again, our requirement is to send an email alert when a video is uploaded to a particular channel in our YouTube. The you tube part is covered in the above step, next is the email alert. Based on the requirement. The operation should be the email alert. Therefore type “Email” in the search. Now the search will list all related operations. Select “Send an email notification (V3)
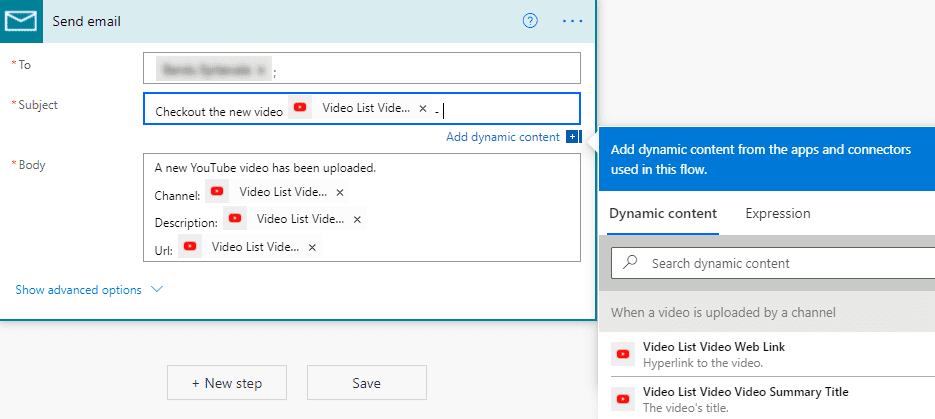
Now you will see a window that looks similar to what we saw while using the template. But, only difference is there is nothing entered. And we need to enter the static and dynamic content as we prefer. (Static – does not change | Dynamic – data changes)
To – Type the email address / addresses / group that the alert should be delivered
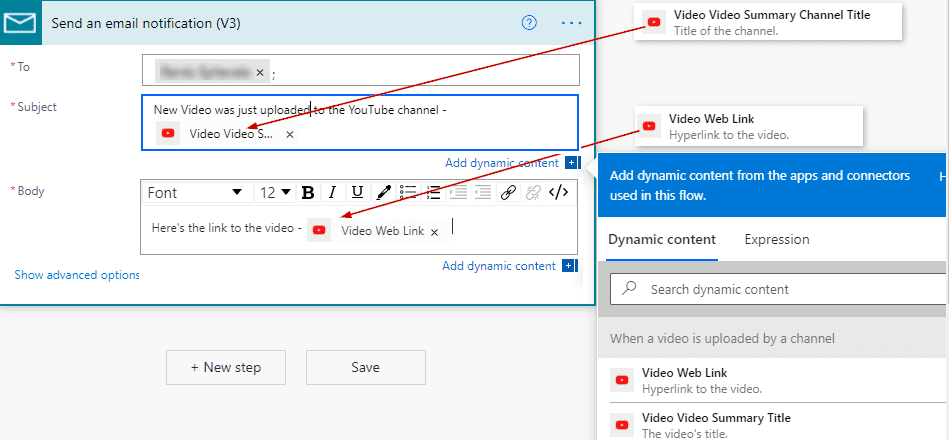
Subject – Type the fixed text that you prefer to share in the email subject and then select the dynamic text from the box “Title of the channel”.
For Example:
Subject – Fixed /Static text – “New Video was just uploaded to the YouTube channel”
Infront of the above text select “Video Summery Channel Title” from the dynamic content box.
Body – Enter the fixed text which will inform users about the video access link and select “Video Web Link” from the dynamic box.
For Example:
Body – Fixed text – “Here’s the link to the video”
Then select “Video Web Link” from the dynamic content box.
Follow the screenshot carefully and you will understand the process that was explained above
Finally, you can save the Microsoft flow.
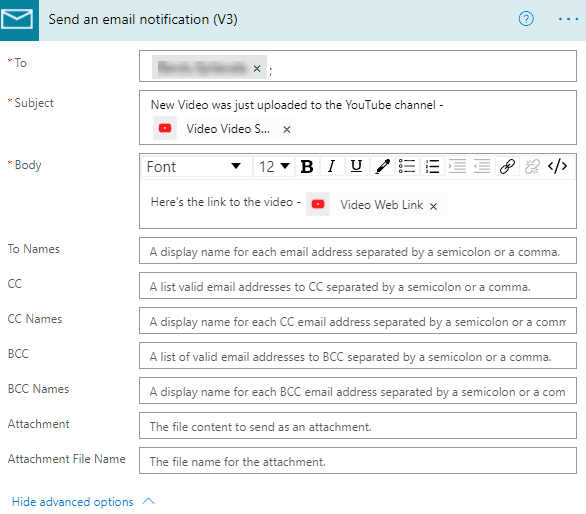
Anyhow, if you need to use advance options like send copies of the email or blind carbon copies of the email with attachments, click “Show advanced options”
Finally click Save. This completes creating a MS power automate flow from the scratch.
Now you should have a clear idea on creating a flow using MS Power Automate templates and creating new flows from the beginning. Next example is on how to “tweet” a message when you upload a new video to YouTube.
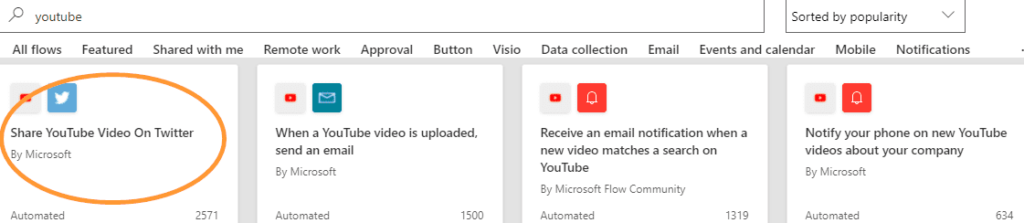
Share YouTube Video on Twitter
This Microsoft Power Automate flow supports you to automatically tweet about the new YouTube videos that you upload. Since there is a template to support this, we will use it to ease up the process.
Login to MS Power Automate, under home tab search for relevant template by typing YouTube in the search bar. Then, select the template “Share YouTube Video On Twitter” and click on it
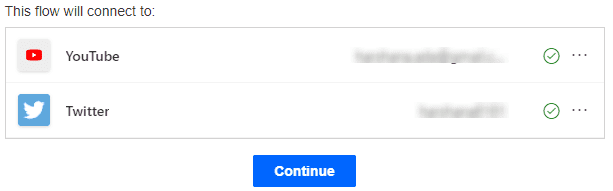
Sign into both YouTube and Twitter by entering your credentials. Follow the screen instructions and authorize the app to login on behalf of you. Then tap on continue.
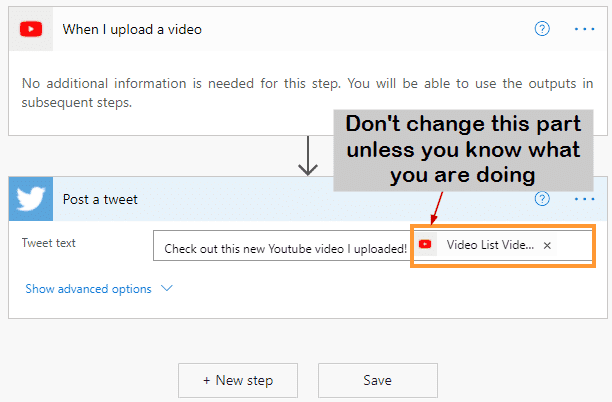
If you are satisfied with the pre generated text in the Tweet Text box, click save. Also, if you need to customize the text, you can type in the custom text. Make sure the text listed with the you tube logo is not changed as it is created through dynamic content box.
Then, Save the MS Flow using the save button
If you go to my flows you will get to see the flows that you have created, also you can edit certain information from this section. Now check out the flow by adding a new YouTube video.
All this time we were checking the Automated Cloud Flows. In the next example we are going to create a Trigger that needs to be manually started. It is called as Instant Cloud Flow.
How to create a reminder using Instant Cloud Flow
Instant Cloud flow can be used for many purposes. However, in this post I will be using the MS Cloud Flow to set up a reminder for ourselves / own reminder. Most often we forget to complete our day-to-day tasks. If we can set up a reminder for our self, we could follow up on most of our work.
This is a simple reminder that works with click, and the reminder comes straight to your inbox in a predefined time. Furthermore, you can create one or more reminders with pre-defined subject and time delay.
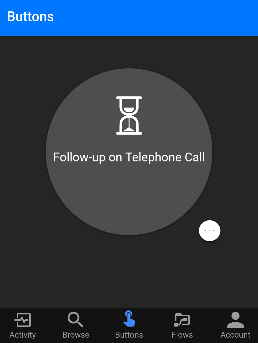
How to create an Instant Cloud Flow reminder to remind you to follow-up on a call
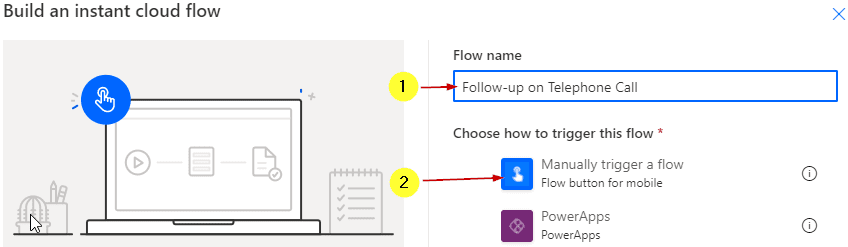
Login into Office account and click create in power automate section. Then select Instant cloud flow.

Enter Flow name to match your need, Example – “Follow-up on Telephone Call”. Next select “Manually trigger a flow” and click on create button.
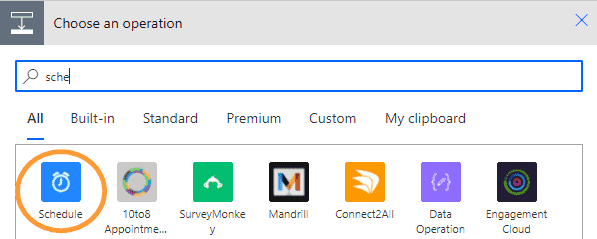
Click “New step”, look for schedule, and select it
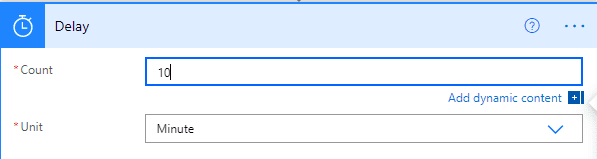
Under Action, select Delay

Now select the delay time for the reminder, since the example is for a follow-up call, let’s set around 10 minutes
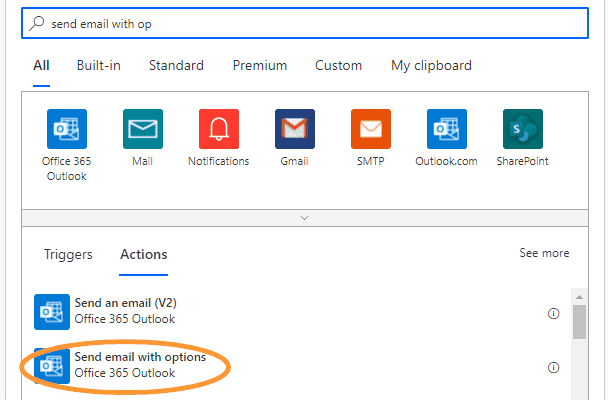
“Next Step” select send email with options
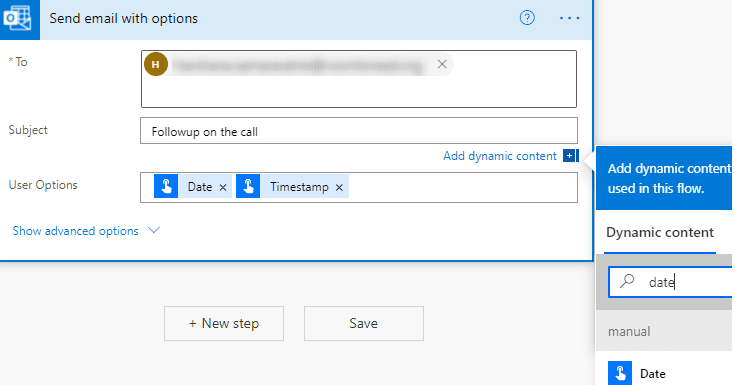
Then, enter your email address in *To section
*Subject: Follow-up on the call. Under user options select “Date” and “Timestamp” from the dynamic content box and hit save button
Once the MS Flow is created it should show up under my flows. The run button starts the reminder

This solution for reminders may seems like a complicated task but we have a solution for that. Power automate mobile app will be the best way to use manual triggers in power automate.
In the next example we will check how to schedule a task using Microsoft Power Automate.
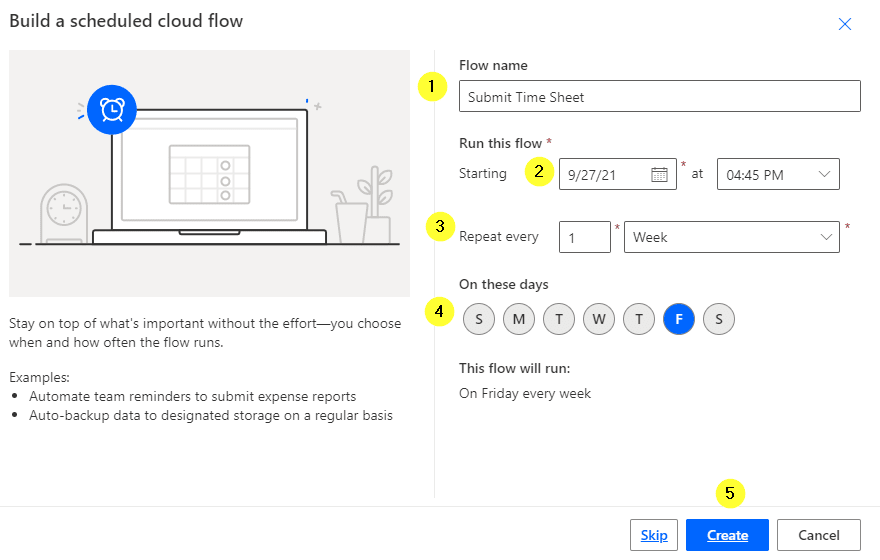
Build a scheduled cloud flow
Scheduled cloud flow can be used to in many ways. If you are curies to know the weather before you leave home. That can be done through the “Get current weather” connecter.

However, to guide you with something more practical, I will be showing an example that reminds myself on every Friday to complete weekly time sheets. If you are manager or a supervisor, the flow can be used to remind your team about submitting the time sheets.
Go to MS power automate and click create, from the list of available flow types select “Scheduled cloud flow”.

Enter Flow name, example – Submit Time Sheet.
Run this flow * – This section allows to set a start date and time for the flow. According to the example current date is selected.
Since the time sheets needs to be completed each Friday select repeat every (1) week. From the list of days select only Friday and press the create button
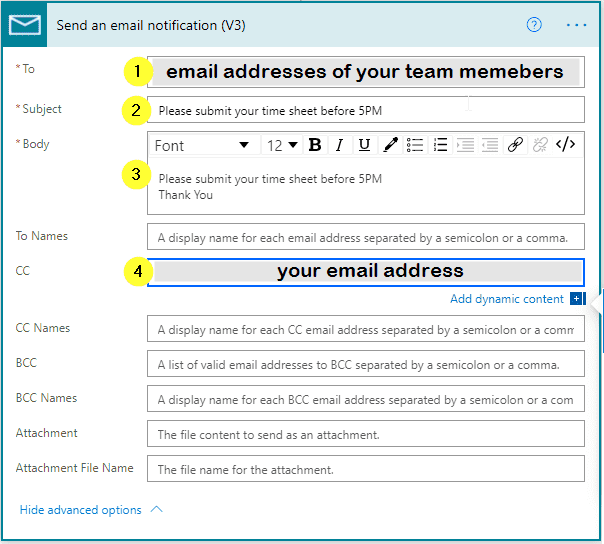
In the next step select Mail, as the reminder should come through email. Under actions select Send email notification.
If you are supervisor and need to monitor your teams time sheets, this lets you send an automated email for all your team members as well.
Update according to the screen capture listed below.
*To – enter all email address of your team members separated by semicolon or a coma
*Subject – email subject (example – Please submit your time sheet before 5PM)
Body: – body of the email (always use a text in the body section to avoid your emails from identified as spam messages)
Then, insert your email address to get a copy of the email message under Advance Section.
Finally save to complete the flow
Out of the five available flow types we have covered 3 MS Power Automated Flows. Since the Microsoft power automate desktop and the Business process does not support free trial of power automate, we will discuss those on a separate post. Also, the Microsoft automate desktop needs advance skills therefore it is better to first get familiar with the flows that we shared in this post.

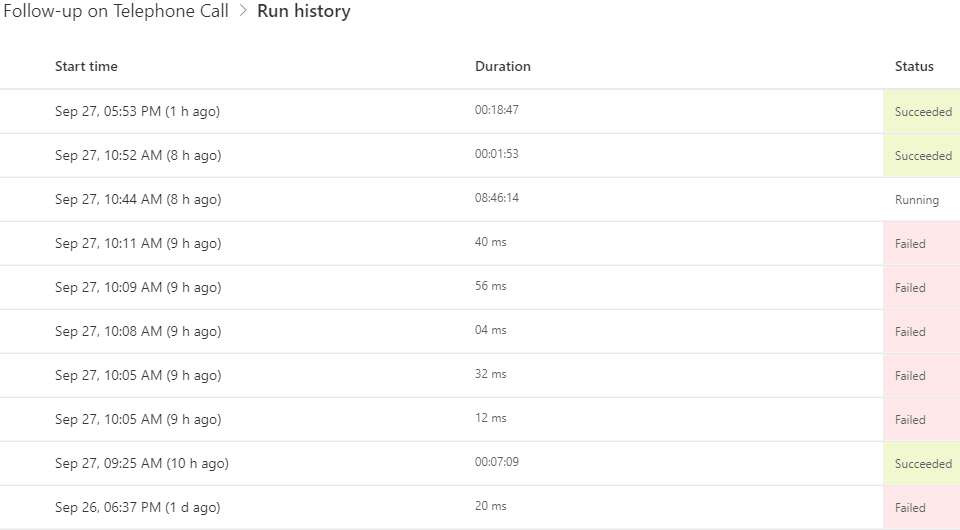
Power Automate log
power automate log / power automate history is helpful for beginners. power automate log can be used to test our own MS flows. Also, the MS flow logs can be used to self-trouble shoot the power automations. In addition, the power automate log keeps a record of accomplishments which helps to identify the number of times that an automation task worked.
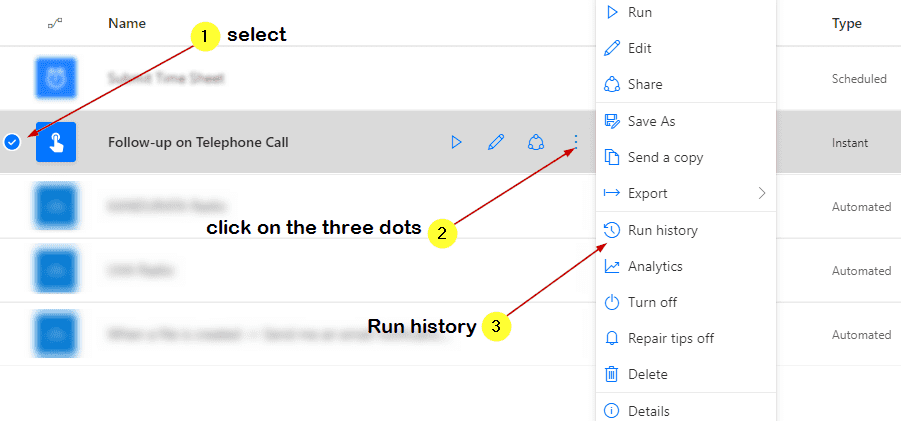
How to check power automate log / power automate history
In My Flows select the flow that you need to check the history. Then click on the three dots and click on Run history
Power Automate Log
Also, the power automate log can be exported to a CSV file and downloaded directory to the computer. CSV files can be opened from MS Excel and many other applications.
Click on Get.csv file – wait for the file to be generated
Then, download file by clicking on it.

Also, many more features can be accessed using the above steps. Which includes Export Power flows, Turn Off / Turn On flows, Delete, Edit, Share, etc.
How to Edit a Power Automate Flow
Under my flows section, hover the mouse on to the flow that you need to edit and click the pencil icon

How to Share a MS Power Automate Flow
Hover the mouse on to the flow that you need to share and select the share icon ![]()

Power Automate Mobile App
The Mobile App for Power Automate is available for both Android and iOS supported devices. Most common features like Activity, browse for available templates and list flows supports through the power automate mobile app. Apart from these common features, there is a separate section allocated for Buttons. And this is where the manually triggered cloud flow buttons get saved. As informed earlier during the follow-up call reminder, thought the manual triggers looks complicated to access on the web interface the power automate mobile app makes it so easy.
We have covered all important aspects of Microsoft Power Automate. Hope the above all examples will help you familiarize with the MS Power flow and create more automated tasks. Please feel free to share your questions and ideas through comments section. Checkout our post about MS Steam