

Last Updated on 3 years by admin
Looking for a way to have all your videos with you, no matter wherever you are? Microsoft Stream is the solution. You can also think of Stream as an answer from Microsoft for your video content. It is a wonderful way to share video content within the organization. Stream lets you provide different people different permission while giving the freedom to access videos from any device.
MS Stream can be used as an alternative to YouTube, however there are advantages and disadvantages that binds with the applications. Unlike YouTube, Microsoft Stream provides more security for your videos. Even by mistake, there is no way that you can share the videos with public or other organizations. Some tech geeks think of this as a limitation of Stream, Microsoft had plans to add public sharing feature in Q4 of 2020. However, up to now we haven’t received any updates or release pans of this feature.
History of Stream
Microsoft Stream was introduced on June 20, 2017, as an alternative to their own product Office 365 Video. Compared to Office 365 Video, MS-Stream has many added advantages and streaming skills to support all current needs of an organization.
Microsoft stream free download
How to Access Microsoft Stream
Microsoft stream login for Tabs, iPads, iPhones, or Android devices
Get Familiar with MS Stream Interface
Features of Microsoft Stream Video Player on Windows based Web Browsers
Configure MS Stream to Support Your Needs
How to Create MS-Stream Groups
How to Create Channels in Stream
Microsoft Stream Supported File Types
How to Record Screen or Video Using Microsoft Sraem
Microsoft stream free download
There is no need to download Microsoft Stream to Windows based Laptop computers. Windows users can access the full featured application through any web browser. Further, to have better compatibility it is recommended to download Microsoft steam for Android and iOS devices.
Here are the Microsoft stream free download links
Android Play Store –
Apple Store –

Purchase Microsoft Stream
Microsoft Steam comes as a part of Office365 license. Some plans do not support MS Stream. Also, you have the freedom to choose license plan according to you or your organizations need. If you are curious to know how much Stream costs or how much the organization spends on giving you this feature check the below chart. This chart includes on the plans that include Stream
| MS Plan | Cost | MS Stream |
| Office 365 E1 | USD$8.00 user/month | YES |
| Office 365 E3 | USD$20.00 user/month | YES |
| Office 365 E5 | USD$35.00 user/month | YES |
How to Access Microsoft Stream
In the beginning I shared that the MS-Stream is the best way to access your videos from anywhere. Therefore, you could be using stream on a Laptop/ Desktop computer, Tab, iPad or on a Mobile. Based on the device you use to access Stream the method of access could be different. Also, access could be different from one organization to another.
Access MS Steam using Windows Based Laptops and Desktop Computers
Windows uses can access Microsoft Stream from any web browser using the Microsoft stream login / office365 login.
Here’s a step guide with screen shots.
- Access the link and type in the email address provided by your organization, Institute etc.
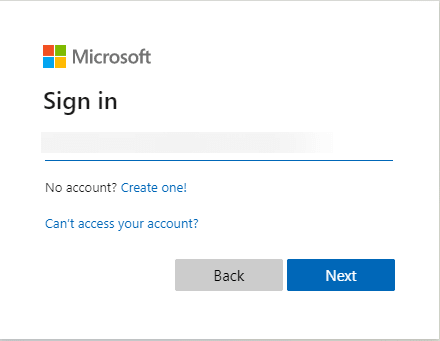
- Select the suitable option from the listing

- Once you get access to the Office365 page, click on the icon from the bottom left corner, next select “All Apps” tab and click on the Steam icon
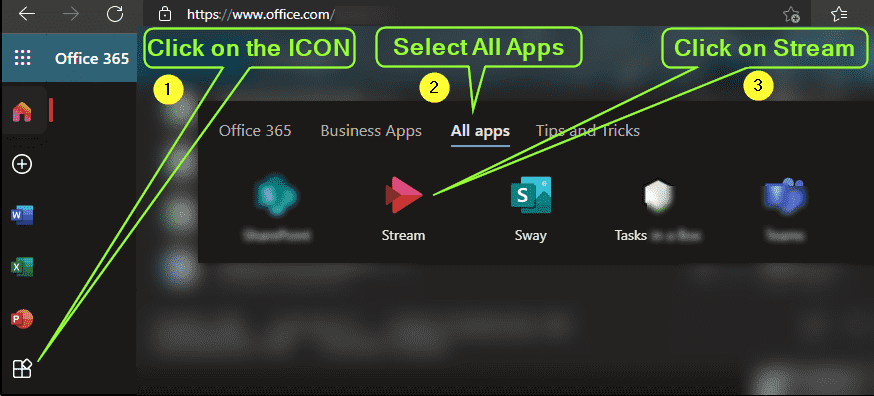
If your organization use a Single Sign on Application like OKTA, then you should be able to access Stream through the provided link. However, in such situations you might need to first access the Single Sign on page and look for the Office365 application. Then you can continue from the above step.
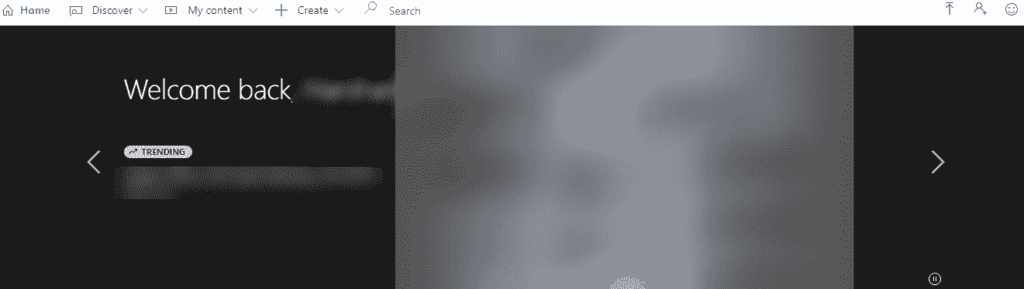
Once you log in to Stream, it will welcome you and display the Trending videos.
Microsoft stream log in for Tabs, iPads, iPhones, or Android devices
As the first step you need to install Steam App from your device specific app store. Direct download links provided in Microsoft stream free download section. Once the App installation is complete open it and provide your login credentials.
Once you are logged in you should see a screen like what’s shared below.
Get Familiar with MS Stream Interface
Both Windows and App interface of MS Stream look similar at once. But when you look into detail there are specific features related to each interface. Therefore, first I will explore the features of MS-Stream while you are logged in using a Windows Device.
MS Stream on Windows
Stream on Windows has more advance features compared to the Android and iOS App.
Let’s check out the main tools available in MS Stream
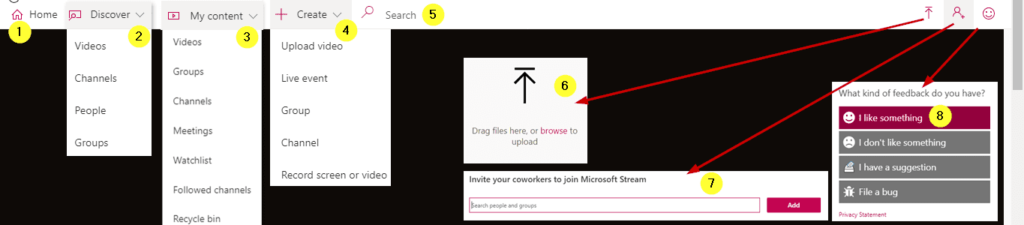
- Home – Provides the five trending videos
- Discover –
- Videos – search videos by name
- Channels – option to search by Channel Name
- People – list down videos by the uploaded person’s name
- Groups – list’s all available groups
- My Content –
- Videos – My Videos
- Groups – Groups I am in
- Channels – Channels I have created
- Meetings – Meetings I recorded
- Watchlist – Videos that I have added to watch list
- Followed Channels – Channels that I follow
- Recycle Bin – Deleted Videos
- Create –
- Upload Video – Drag and Drop / Browse and upload
- Live Event – Broadcast live event (this feature needs some advanced configurations)
- Group – Create Group/s
- Create – for Channel/s creations
- Record Screen or Video – Gives you the freedom to record up to 15 minutes video of your screen / selected window with or without integrated camera. Once the microsoft stream recording is complete you can view and decide whether to save or retake the video. This feature could come in handy for short trainings. The 15-minute limit is only for one clip therefore you can record a training even into a series of 15 min clips
- Search – search within MSStream
- Upload – Another way to upload Videos. Supports Drag and Drop / Browse and select options
- Invite your coworkers to Microsoft Teams – This could be used if only few of your team members has license to Stream. Invitations are limited to internal team members
- Feedback
Features of Microsoft Stream Video Player on Windows based Web Browsers
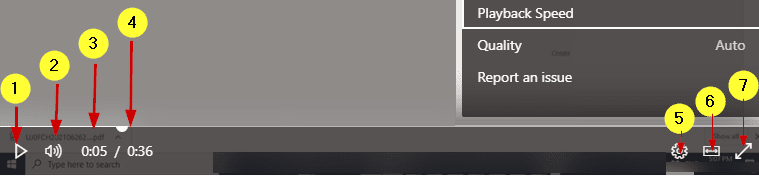
- Play / Pause Button – Let’s you start playing the video and stop the video at any point
- Speaker – Volume Increase / Decrease and Mute Functions
- Time / Length – Display the played time of the video as well as the total length of the video
- Progress Bar – Shows the current position of the displayed video and gives you access to drag the video content as required
- Settings –
- Let’s you control Playback Speed (highest up to 2x and lowest up to 0.5)
- Can change playback quality (Audio Only / 540p, 720p, 1080p and auto)
Thought the MS Stream Support Audio Only play back uploading of Autio Only Content / File Types are not support - Report issue/s.
- Theater Mode – Displays the video in a wide screen while giving you the possibility to scroll through the comments…etc.
- Full Screen Mode
Apart from the main Features listed above MS-Stream also supports
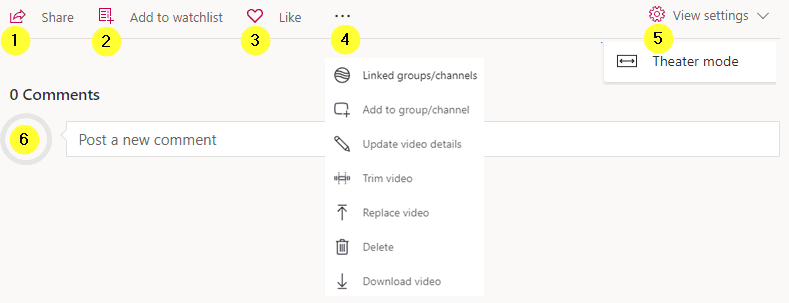
- Sharing Videos among your team members. There is no way to share the videos with external groups at this moment
- Add videos to watch list
- Like videos
- Check linked groups/ channels, add to groups and channels, update video details, trim and replace video, delete, and download video. These features are available depending on the access level you have for the video that is displayed on the screen
- Video Setting lets you change the view to theater mode
- Comment on Videos
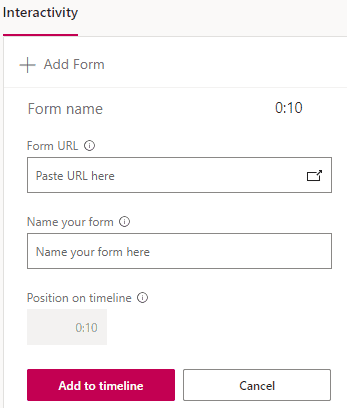
MS-Stream also supports Interactivity features like adding forms to the timeline.
Microsoft Stream App
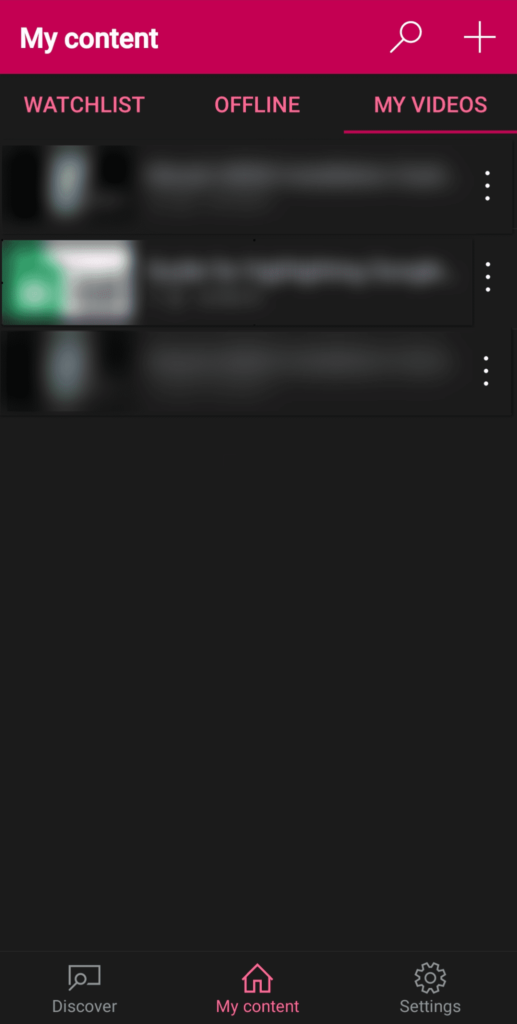
The Stream app on both iOS and Android looks similar. And the below screen shot is from an Android phone App.
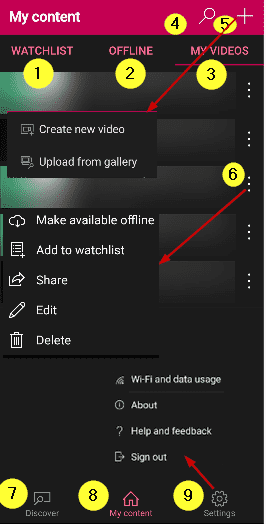
Check the numbers with above image for better understanding
- Display the videos that you have added to watchlist
- Offline feature supports to watch previously downloaded videos even while you are not connected to internet
- My Videos section shows the content that you have uploaded to MS Stream
- Search Option
- Add Videos/ Upload Videos
- Create new video lets you create videos using the Mobile / Tab camera. This option also allows to use main camera or the selfie camera for video capturing
- You can select and upload existing videos from the Gallery
- The three dots next to the existing videos enables you do make changes to the already uploaded videos
- Make available offline – with this option you can download videos and save it to use while you are not connected to internet. (Videos that are downloaded is saved in the Steam App in an encrypted format, which supports playback only through the app)
- Add to watch list – like booking marking a webpage, it will give you easy access.
- Share – Let’s you share the video/s as a link. Mostly Supports sharing through MS Outlook & MS Teams apps. Note – Access for the shared videos are limited to your organization / institute
- Edit – This allows to edit the name, description, language, share option (public/only by link) and video options (enable/disable comments, auto generate captions) of the vides that you have uploaded or have full access
- Delete – Allows deleting the video
- Discover – In the Windows version discover tab provides many search possibilities. However, the App only displays a list of available videos according to the video permissions
- My Content – List of videos that was unloaded by me or under my account
- Settings –
- Wi-Fi data usage –
- Streaming Video quality selection (standard/ Higher)
- Downloads – Wi-Fi Only / or not
- Download Video Quality (standard/ Higher) – this is for offline videos
- About – App version, Privacy info, Terms of use & Third-party notices
- Help and Feedback –
- Guides on getting started
- Troubleshooting steps
- Community discussions (share findings/request help)
- Blog – read on updates by others
- Share feedback
- Shake Device to give feedback (enable/disable option)
- Wi-Fi data usage –
Up to this point I have covered all available options in Microsoft Steam. If you followed the post from beginning, you should have an understanding on what each tab or button does. In the next section I will be showing how to use / configure MS Streams interface to support the work that you do.
Configure MS Stream to Support Your Needs
Though Microsoft Stream is part of the Microsoft products it acts bit differently when it comes to permissions. Usually, Microsoft leaves the permissions for system administrators and power users. However, in Steam each user can decide on who has access to the videos, groups, and channels. Mostly setting up the permission is done through Groups.
How to Create MS-Stream Groups
Before creating a group, you need to identify the target group for your Stream Videos.
Example for a group – This can be your project group, your supervisor and few resource people from other Teams within the organization
At the time of creating the group you can also decide whether other members in your group can add their vides to the same group or not.
Also, if you need to give access to everyone in the organization then you can mark the group as public.
Steps to create a Steam Group
- Login to MS Stream using a web browser
- Click on Create
- Then select Group
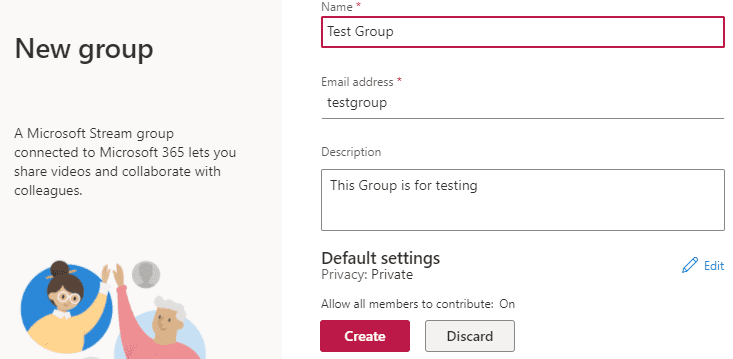
- You should see a new window like below
This allows to give your group a name. Mine is “Test Group”, the email address will automatically be updated, you don’t need to make any changes in email section. - Next, add a Description. I have added “This Group is for testing” as this is only created for testing
By default, the groups are created with Private, and members can contribute to the group. If these settings suits for your need, go ahead and click “Create”. Anyhow, for better understanding I will guide you through the extra options as well.
- Click “Edit” to set advanced options
- Now, you can select Private or Public for your group type
As clearly mentioned in the below screen shot, public enables access to every in the organization and private lets you decide who gets access
Allow all members to contribute – enable others in your group to add videos to the same group

- Since this guide should cover all available options, I have selected “Private” while creating my test group. Which allows adding members to my group.
- Type the names of team members you need to add to the group and click Add.
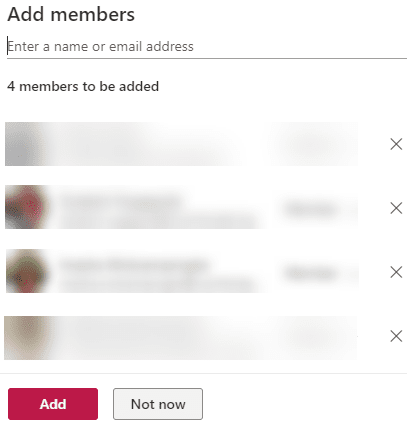
Now, the Group is created.
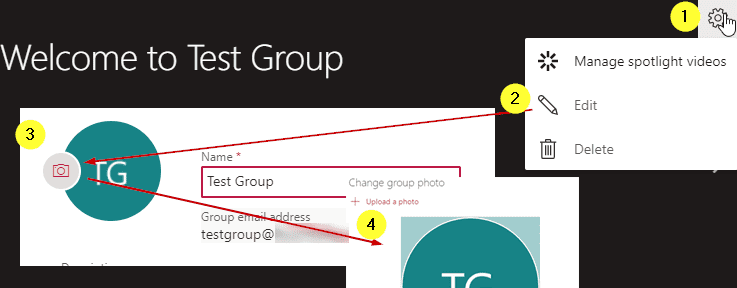
Furthermore, depending on your choice you can add a Group Photo by going to the group settings > Edit>Upload a Photo.
Note – If you have access to Microsoft Teams and if you have groups in Teams those groups will automatically show up under MS Stream groups.
If Microsoft 365 Groups are created or changed in other MS 365 services, there could be a 1–2-hour delay before those changes synchronizes with Stream. Likewise, Groups created in Stream could take some time before they show up other places in Microsoft 365, depending on the other application.
Warning – Deleting a group in Microsoft Stream will delete the Microsoft 365 group and remove connections to any videos in the group, but the videos will remain on Stream. Since a group in Stream is also a Microsoft 365 group, it will also delete all information and data related to the group from Microsoft Teams, SharePoint, Outlook, and other applications, including group files, messages, and tasks, etc.
Under One Group there can be many Channels, but a channel cannot be linked with two groups
How to Create Channels in Stream
Having a channel or channels in your stream is also important as having groups. According to Microsoft, Channels are organizations method for videos, but not a permission method. In simple words we can say channel is where you group the videos you make and upload not according to permissions but according to type or subject.
Companywide channels must have a unique name across your organization.
Group channels must have a unique name within a group.
Therefore, to cater the correct audience you need to have groups as well as channels in your MS-Stream account.
Steps to Create MS Steam Channels
- Loin to MS Stream using a web browser
- Click on Create
- Select Channel
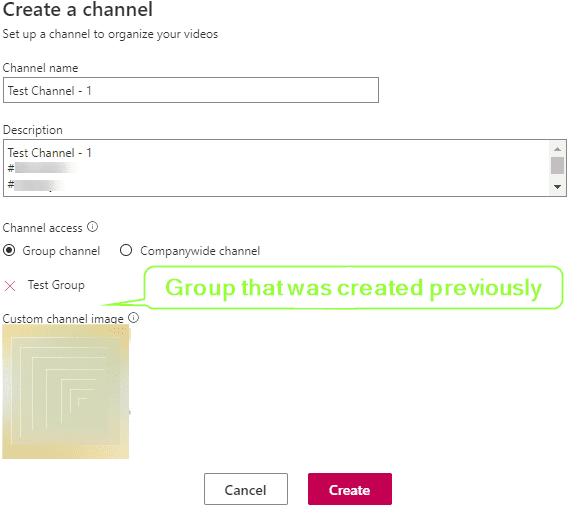
- Type in Channel Name, and Description. The description also supports hash tags
- Next you can select Channel Access- In this section you get to decide whether your channel is available for whole company or for the groups. I have selected the previously created “Test Group”
- Finally, upload a channel image and click on create to complete the channel creating. Check screenshot shared for better understanding.
How to Upload Vides to MS-Stream
Before upload video stream, we need to understand the supported file formats for MS Stream.
Check the chart provided for detailed information on supported file types
Microsoft Stream Supported File Types
| FLV (with H.264 and AAC codecs) (.flv) | AVI (Uncompressed 8bit/10bit) (.avi) |
| MXF (.mxf) | MP4 (.mp4, .m4v)/ISMV (.ismv) |
| GXF (.gxf) | Microsoft Digital Video Recording (DVR-MS) (.dvr-ms) |
| MPEG2-PS, MPEG2-TS, 3GP (.ts, .ps, .3gp, .3gpp, .mpg) | Matroska/WebM (.mkv) |
| Windows Media Video (WMV)/ASF (.wmv, .asf) | QuickTime (.mov) |
Tips & Notes-
Although all the above formats are supported by Stream, not all of them are accessible (for example: .wmv). For the most accessible video, use the .mp4 format.
Microsoft Stream does not support audio-only media files
If anyone needs to add an Audio Only file to Stream, you can use Windows Video Editor to convert the video to MP4 by adding a still image.
Upload Video to MS Stream
- Loin to MS Stream using a web browser
- Click on Create
- Locate the video and drag and drop it or select the file using browse button
- Once the video is selected it will show a progress bar for uploading stats and then it will show the processing status.
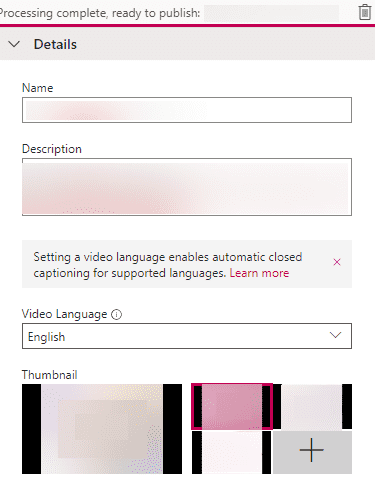
- Under Details
- Add Video Name
- Video Description
- Video Language (Setting a video language enables automatic captioning for supported languages.)
- Thumbnail – let viewers see a quick snapshot of your video as they’re browsing.
You can select the thumbnail from displayed images or upload a different image using the + button
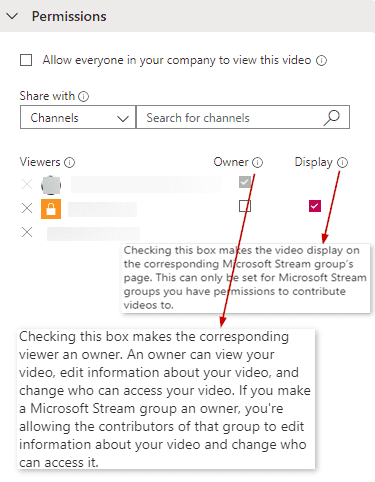
6. Permissions
- Remove company wide access to this video – It will remove access from all companywide channels. People and groups you previously selected will continue to have access.
- Share with – There is a search option that lets you search for People, Channels or Groups. For training purpose, I have selected the “Test Channel – 1” which I created previously
Check screen shot for additional details
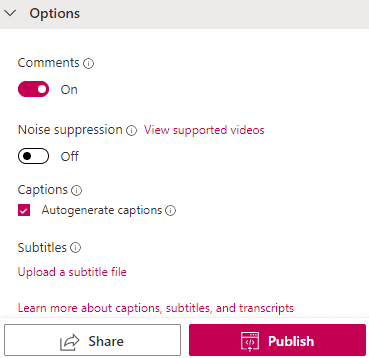
7. Options
- Comments – Enable/Disable
- Noise suppression – Allows viewers to isolate Speech from other sounds
- Auto Generated captions
- Subtitles – lets you upload subtitles
- Finally, the publish button completes the video uploading to Stream. If not, you can share the video
You can use Windows Video Editor also known as Windows Movie Maker to create videos for MS Stream. Also, there are many other free and paid applications that supports video editing. If you don’t have access to any of the above editing applications try using the free online video editors.
Finally, we are going to check out the best option of Microsoft Stream. Which is called as Record Screen or Video.
How to Record Screen or Video Using Microsoft Sraem Recording
Screen recorder is one of the widely used options in MS Stream, it helps up create trainings, video guides, etc. Currently the supported length of screen / video recording is limited to 15 minutes however, if you have access to a video editor there is an option to merge the clips. If not, you can create a series of video recordings to complete the training as preferred.
How to use Record Screen
- Loin to MS Stream using a web browser
- Goto Create
- Click on Record Screen or Video
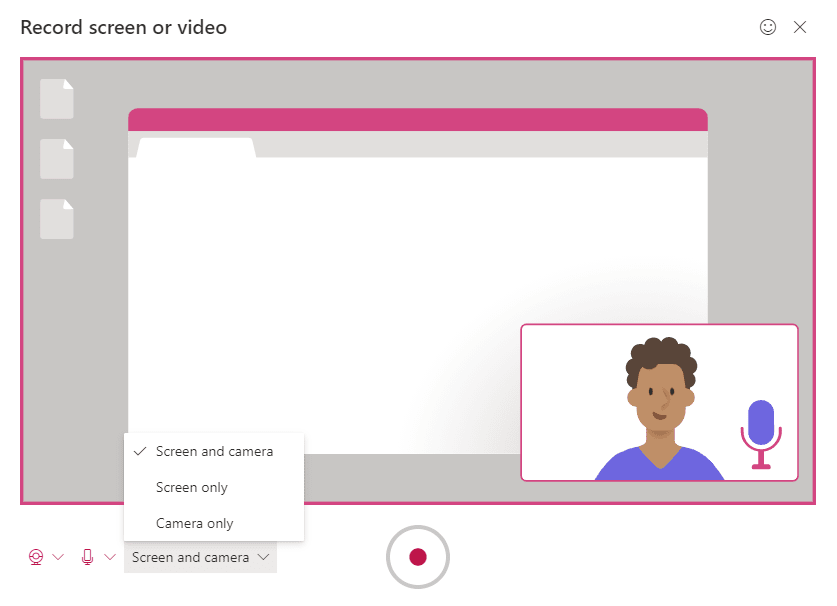
- In the popup screen select the Correct Webcam and Microphone then select
- Screen and Camera
- Screen Only
- Camera Only
- Start recording using the record button
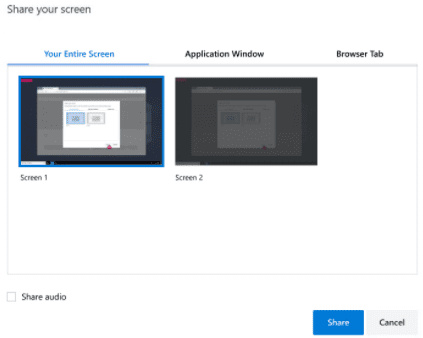
- Before the recording starts it will ask whether to share the entire screen, application windows or browser tab. You can select the required option to meet your need.
Share Audio option lets you include audio from your computer in the recording.
Once the settings are selected click “Share”
7. Now you will see a count down, and the recording will begin. Play / Pause button lets you freely start/stop the recording. However, the total length of a single recording is supported only up to fifteen minutes
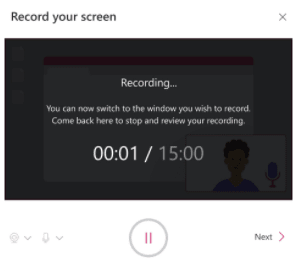
8. During the recording you can move your camera to any location in the screen
9. Once the recording is complete click Next
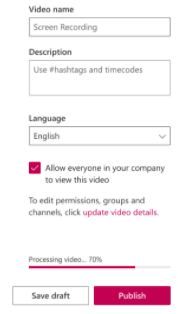
10. Now, you can check a recording before it’s uploaded, if you are not satisfied retake the recording using “Record Again” button. Finally, to upload the file by clicking “Upload to Stream”

11. Now, provide a name and a description for the video. Select Language. And choose permission as preferred by adding the video to correct channel / group or by giving public access. Once you have completed click “Publish” if you need further editing save the video using “Save Draft” option
This completes the guide on MS Stream, there are some basic features like adding/editing auto transcripts which can be easily identified using the screen instructions. Apart from that the Stream mobile app also supports key features that I have covered in this post. You can use this post as a supportive document for mobile app as well. However, note that the features of the web application and the mobile app are different.
Also, feel free to share your ideas, questions through the comments section and checkout my other posts to improve your knowledge on related topics. Checkout Microsoft Power Automate